border
sSNAKESs : Reptile Forum
 

Go Back   sSNAKESs : Reptile Forum > Lizard Forums > Varanid

Notices

Closed Thread
 
Thread Tools Display Modes
Old 02-08-13, 11:54 AM   #1
varanus1
Member
 
Join Date: Mar-2012
Posts: 66
Country:
Ackie Enclosure Build

Started off with this tub super thick and strong and had a wide rim for attaching top which was super easy.

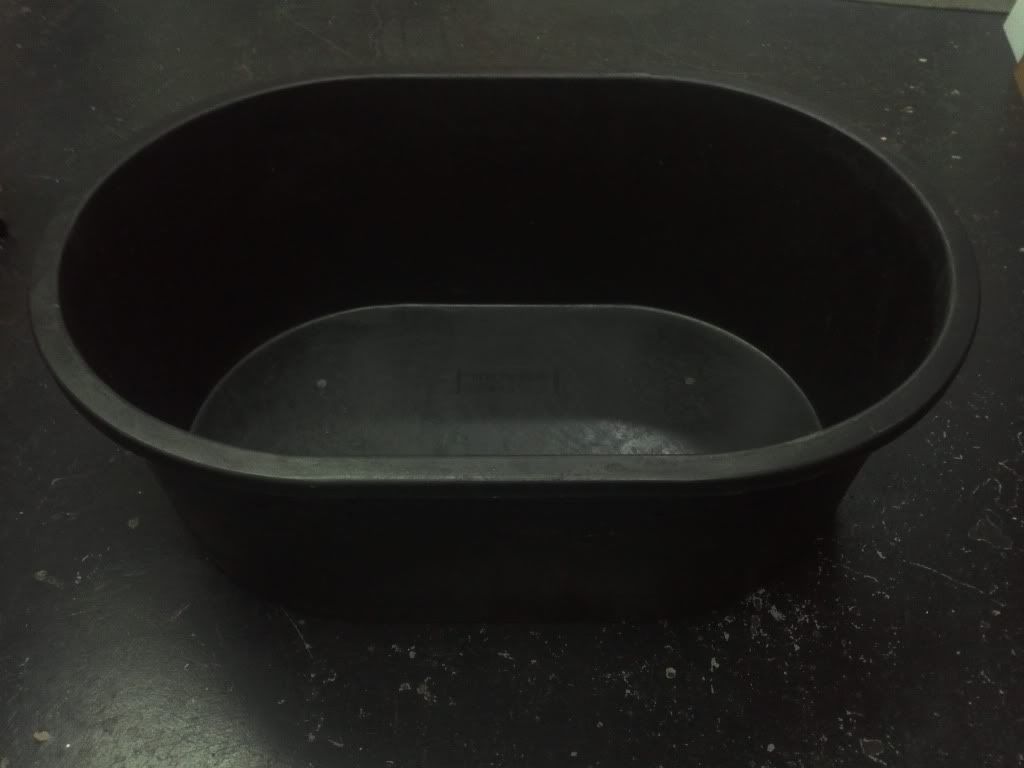
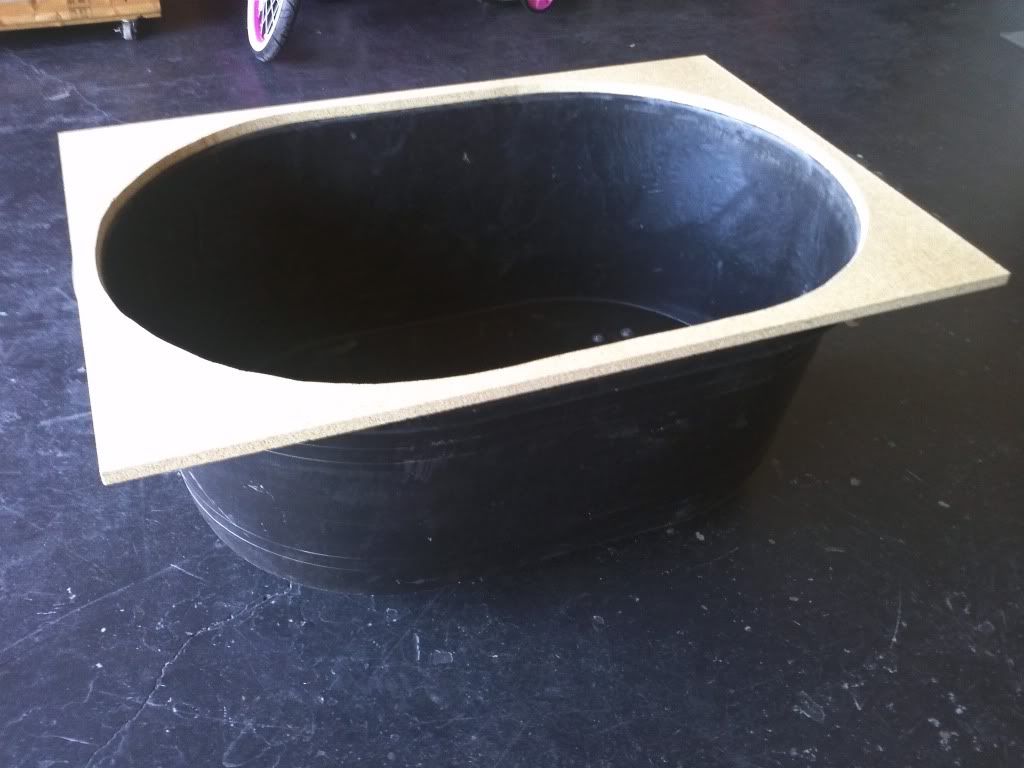
Next is the part that went on the tub cut to length and width of tub used and than bolted to tub. Tub has a wide heavy duty rim 1 1/2"wide and flat so it sat perfectly.
Next i bolted some heavy duty wheels to bottom.
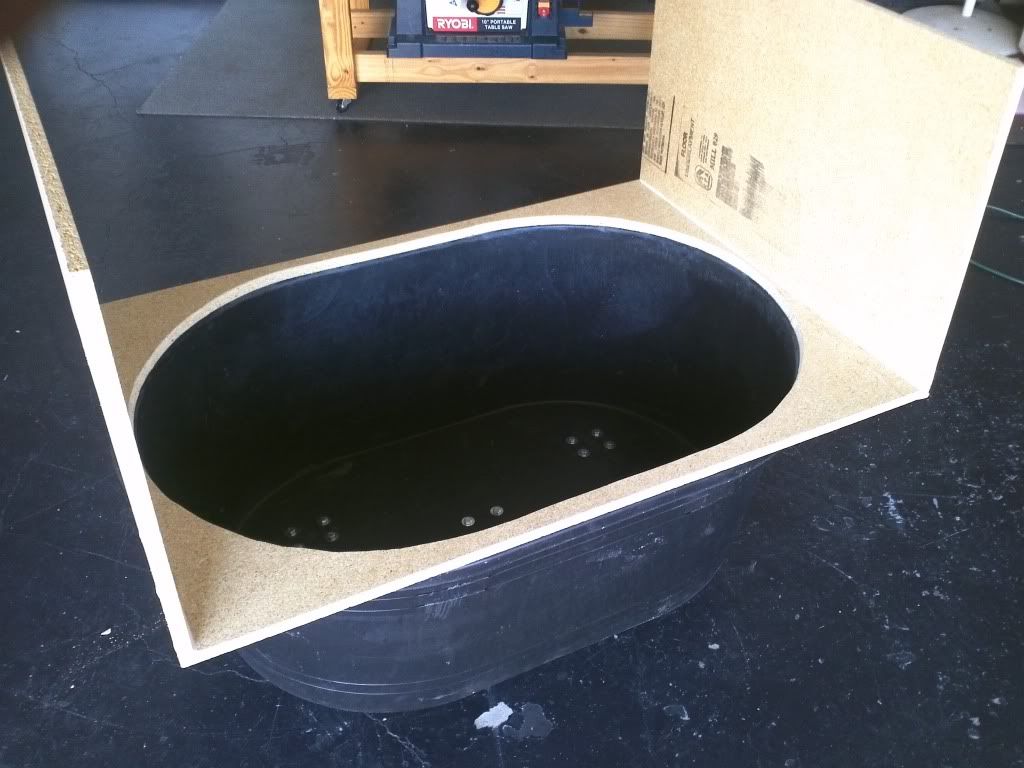
This was fun i used a jig saw to cut out around the inside of tub. Started with cutting huge section close as possible to edge to see what i was doing and than rode the saw blade along the tub wall.

everything else was than joined screwed and glued

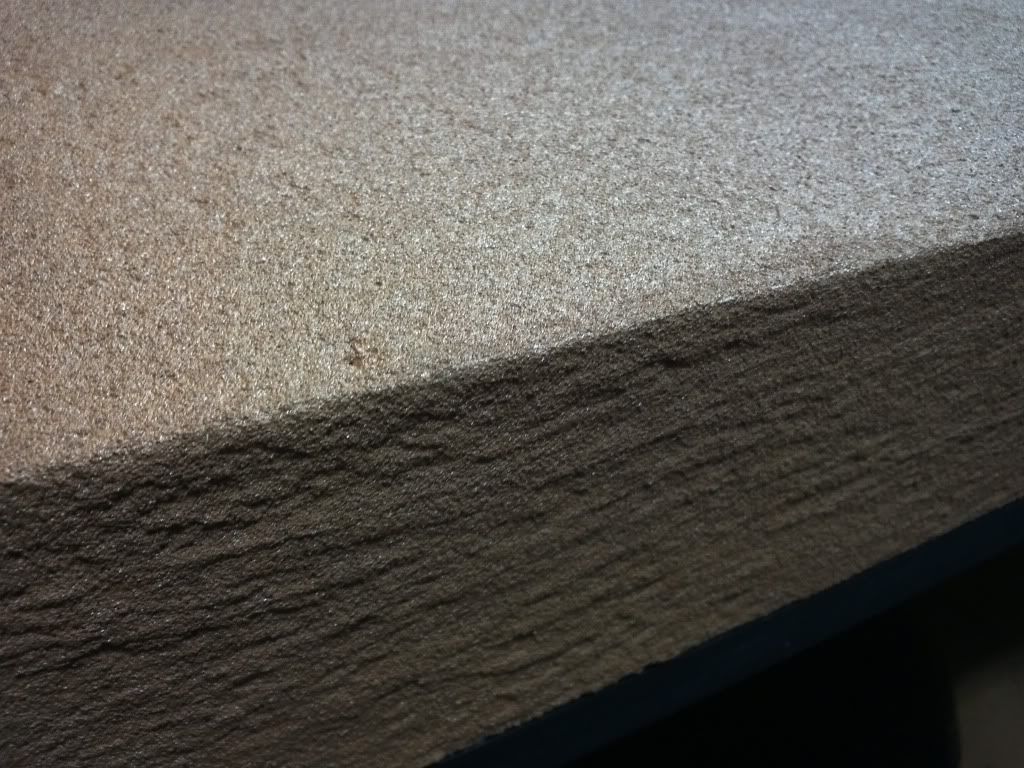
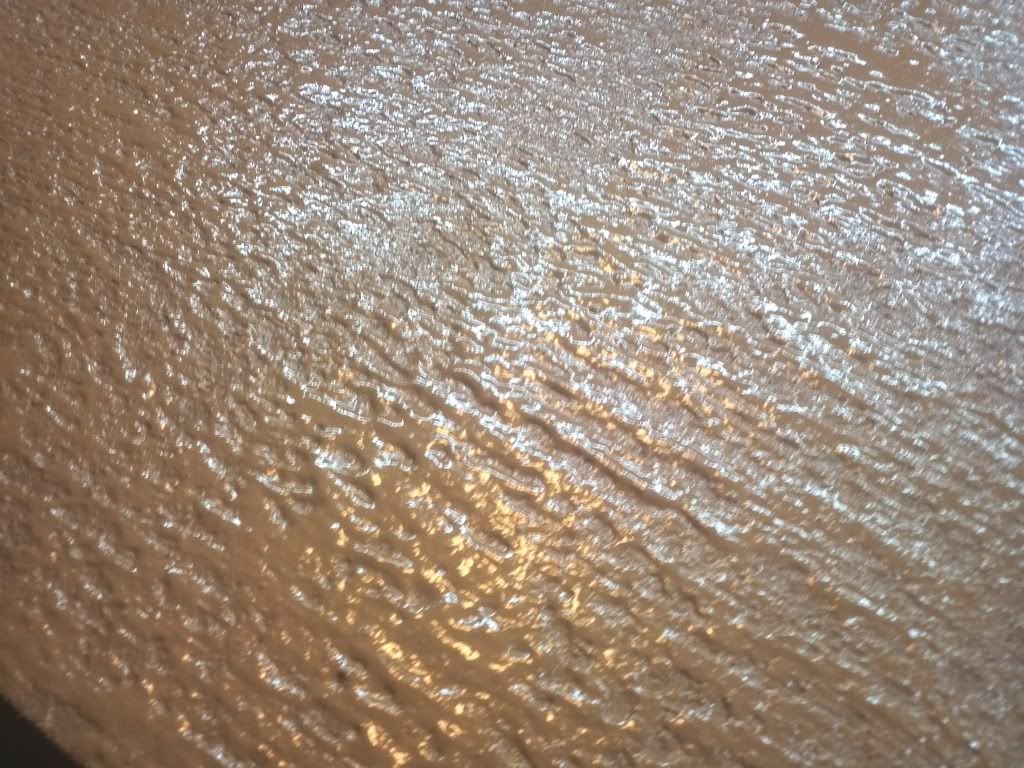
Now came the fun part i used a new product i got at lowes called restore its like putting on a cement finish it has soo much grit mixed in it was like putting on cement.A special roller was used and 2 coats are required.I also went over it so soft with a brush to create a different texture.When this is dry its rock hard.
Here is the coating when dry looks nice

Next the inside was coated and rest was brushed out to create texture hard to see.

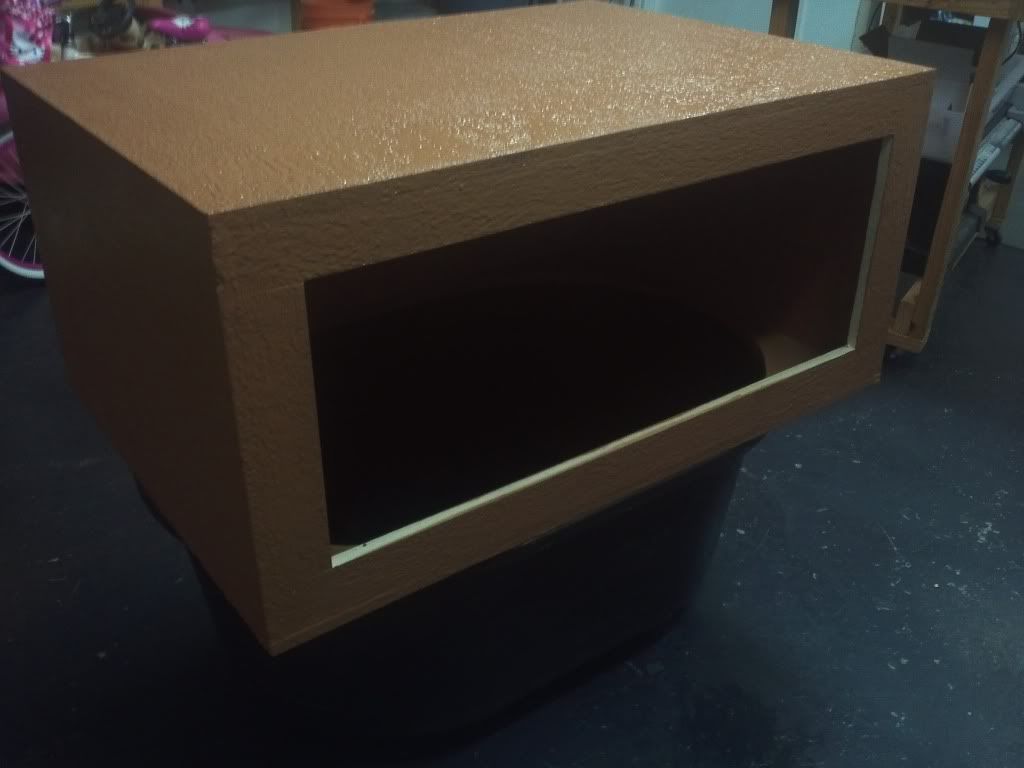
This is to show you how the texture looks.Still not dry will darken up.Many color choices they had so i went with clay color.

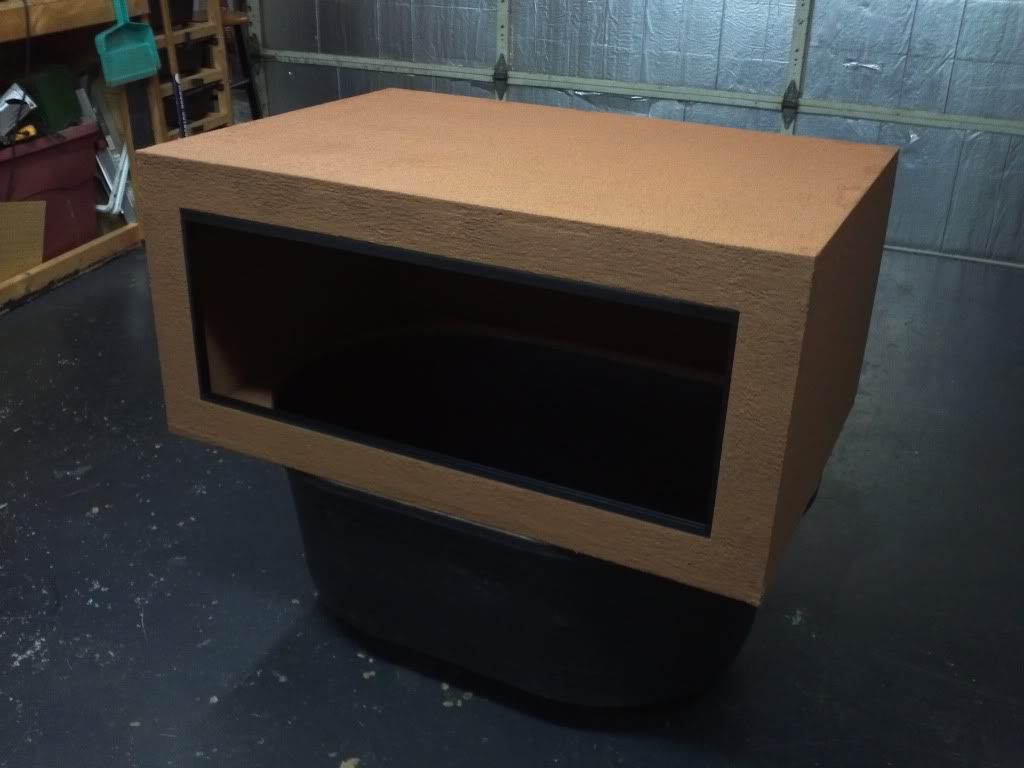
Almost done coating is dry and door tracks on.
varanus1 is offline  
Login to remove ads
Old 02-08-13, 12:10 PM   #2
Gungirl
Diesel the pumpkin killer
 
Gungirl's Avatar
 
Join Date: Mar-2011
Age: 41
Posts: 5,352
Country:
Re: Ackie Enclosure Build

Looking good.. Are you going to build a box to enclose the tub?
__________________
Kat
Gungirl is offline  
Old 02-08-13, 12:15 PM   #3
varanus1
Member
 
Join Date: Mar-2012
Posts: 66
Country:
Re: Ackie Enclosure Build

Quote:
Originally Posted by Gungirl View Post
Looking good.. Are you going to build a box to enclose the tub?

Thanks. Did you not see the other pic's below the tub ? its already enclosed.
varanus1 is offline  
Old 02-08-13, 12:19 PM   #4
DiscoPat
Member
 
DiscoPat's Avatar
 
Join Date: Jun-2012
Location: Eugene OR
Posts: 230
Country:
Re: Ackie Enclosure Build

Quote:
Originally Posted by varanus1 View Post
Thanks. Did you not see the other pic's below the tub ? its already enclosed.
I think she meant around the bottom so it looks kind of like a cabinet or dresser.
DiscoPat is offline  
Old 02-08-13, 01:07 PM   #5
varanus1
Member
 
Join Date: Mar-2012
Posts: 66
Country:
Re: Ackie Enclosure Build

oh no im not but it would be very easy to do so.
varanus1 is offline  
Login to remove ads
Old 02-08-13, 09:09 PM   #6
alessia55
Retired Moderator
 
alessia55's Avatar
 
Join Date: Sep-2011
Location: Miami
Posts: 8,469
Country:
Send a message via AIM to alessia55
Re: Ackie Enclosure Build

I'm looking forward to seeing what this looks like when it's done. Keep us posted
__________________
Alessia
Quote:
"Until one has loved an animal, a part of one's soul remains unawakened." -Anatole France
alessia55 is offline  
Old 02-09-13, 08:22 AM   #7
varanus1
Member
 
Join Date: Mar-2012
Posts: 66
Country:
Re: Ackie Enclosure Build

last pic shows it done. Just missing dirt,heat and glass doors. I tired taking pic of it with those things but the heat light always glares the pic and comes out crappy.
varanus1 is offline  
Old 02-09-13, 10:36 AM   #8
DiscoPat
Member
 
DiscoPat's Avatar
 
Join Date: Jun-2012
Location: Eugene OR
Posts: 230
Country:
Re: Ackie Enclosure Build

Quote:
Originally Posted by varanus1 View Post
last pic shows it done. Just missing dirt,heat and glass doors. I tired taking pic of it with those things but the heat light always glares the pic and comes out crappy.
If you have a DSLR Camera you could try turning it to manual settings and choosing the exposure and shutter speed to use.


If the problem is the flash and the area is dim
try an aperture of 4.2 or so and a Shutter Speed of 30 or 15 depending how steady your hand is

If the problem is just the light from the bulbs
try taking it with flash on, an aperture of around 5.6 and a shutter speed of around 100.

Flash may be hard to do because of the glass door but with the right shutter speed and aperture it shouldn't glare near as much.
DiscoPat is offline  
Old 02-09-13, 10:41 AM   #9
varanus1
Member
 
Join Date: Mar-2012
Posts: 66
Country:
Re: Ackie Enclosure Build

Quote:
Originally Posted by DiscoPat View Post
If you have a DSLR Camera you could try turning it to manual settings and choosing the exposure and shutter speed to use.


If the problem is the flash and the area is dim
try an aperture of 4.2 or so and a Shutter Speed of 30 or 15 depending how steady your hand is

If the problem is just the light from the bulbs
try taking it with flash on, an aperture of around 5.6 and a shutter speed of around 100.

Flash may be hard to do because of the glass door but with the right shutter speed and aperture it shouldn't glare near as much.
Cell phone camera sorry.
varanus1 is offline  
Old 02-09-13, 12:57 PM   #10
Lankyrob
Non Carborundum Illegitimi
 
Lankyrob's Avatar
 
Join Date: Mar-2010
Location: Keynsham
Age: 49
Posts: 9,556
Country:
Re: Ackie Enclosure Build

Quote:
Originally Posted by varanus1 View Post
Cell phone camera sorry.
Glass doors are a pian in the arse BUT a solution i have found is to hold the phone at an angle to the glass so that the reflecting light doesnt all come back to the camera lense
__________________
May you have more good days than bad
You never know how strong you are - until being strong is your only choice
There are no dark clouds - just well hidden silver linings!!
Lankyrob is offline  
Login to remove ads
Old 02-09-13, 05:09 PM   #11
Pirarucu
Member
 
Pirarucu's Avatar
 
Join Date: Apr-2012
Posts: 2,054
Country:
Re: Ackie Enclosure Build

I presume the coating is waterproof?
Pirarucu is offline  
Old 02-09-13, 05:47 PM   #12
varanus1
Member
 
Join Date: Mar-2012
Posts: 66
Country:
Re: Ackie Enclosure Build

Quote:
Originally Posted by Pirarucu View Post
I presume the coating is waterproof?
Very yes. its made for decks.Its like a cement coating
varanus1 is offline  
Old 02-09-13, 05:57 PM   #13
Pirarucu
Member
 
Pirarucu's Avatar
 
Join Date: Apr-2012
Posts: 2,054
Country:
Re: Ackie Enclosure Build

Quote:
Originally Posted by varanus1 View Post
Very yes. its made for decks.Its like a cement coating
You said it is applied using a roller, how big is it and what kind? Could it be applied to rockwork easily? Including rock ledges and such?
Pirarucu is offline  
Old 02-09-13, 06:03 PM   #14
varanus1
Member
 
Join Date: Mar-2012
Posts: 66
Country:
Re: Ackie Enclosure Build

Quote:
Originally Posted by Pirarucu View Post
You said it is applied using a roller, how big is it and what kind? Could it be applied to rockwork easily? Including rock ledges and such?
I didn't make the stuff just using the product bought at lowes but Yes the special roller creates the texture but after it was rolled on i used a brush to fan out the texture to a fine texture. It can be used on anything just about so yes.Im sure a brush can also be used as i did inside the cage. Not the same results but close
varanus1 is offline  
Old 02-09-13, 06:25 PM   #15
Pirarucu
Member
 
Pirarucu's Avatar
 
Join Date: Apr-2012
Posts: 2,054
Country:
Re: Ackie Enclosure Build

So the roller was just for texture? Could it be applied to somewhat tight spaces? How is the consistency before it sets, and how long does it take before it is too dry to make changes?
Pirarucu is offline  
Login to remove ads
Closed Thread


Posting Rules
You may not post new threads
You may not post replies
You may not post attachments
You may not edit your posts

BB code is On
Smilies are On
[IMG] code is On
HTML code is Off

Forum Jump


All times are GMT -6. The time now is 01:52 AM.

Powered by vBulletin®
©2000 - 2025, Jelsoft Enterprises Ltd.
Copyright © 2002-2023, Hobby Solutions.

right