|
|  |
| Notices |
Welcome to the sSnakeSs community. You are currently viewing our boards as a guest which gives you limited access to view most discussions and access our other features. By joining our free community you will have access to post topics, communicate privately with other members (PM), respond to polls, upload content and access many other special features. Registration is fast, simple and absolutely free so please, join our community today! If you have any problems with the registration process or your account login, please contact contact us.
|
 11-22-15, 02:17 PM
|
#16
|
|
Member
Join Date: Aug-2013
Posts: 725
Country: 
|
Re: FW's (mostly) DIY Snake Room. (Pic heavy)
Nice cages! I will still be using glass on all my cages but I am going to bump up the thickness on mine which means no more big box store glass (they only carry thin stuff), I did get a slight crack from pulling on it while it was still latched like an idiot.. mine are swing out.
The racks look nice, too.
|

|
|
|
11-22-15, 03:13 PM
|
#17
|
|
Member
Join Date: Mar-2015
Posts: 3,317
Country:
|
Re: FW's (mostly) DIY Snake Room. (Pic heavy)
Wow, I don't know where to start to say thanks and kudos. Amazing craftsmanship on the racks both adult and the hatchling rack! The incubator looks great and obviously works appropriately. The snake hooks (makeshift) surely was something I never thought of. Congrats on the clutch as well. Thank you for all the insight and exposure to DIY.
|
|
|
|
|
12-07-15, 11:30 AM
|
#18
|
|
Member
Join Date: Mar-2014
Location: Victoria, TX
Age: 40
Posts: 774
Country:
|
DIY wood pallet snake hides
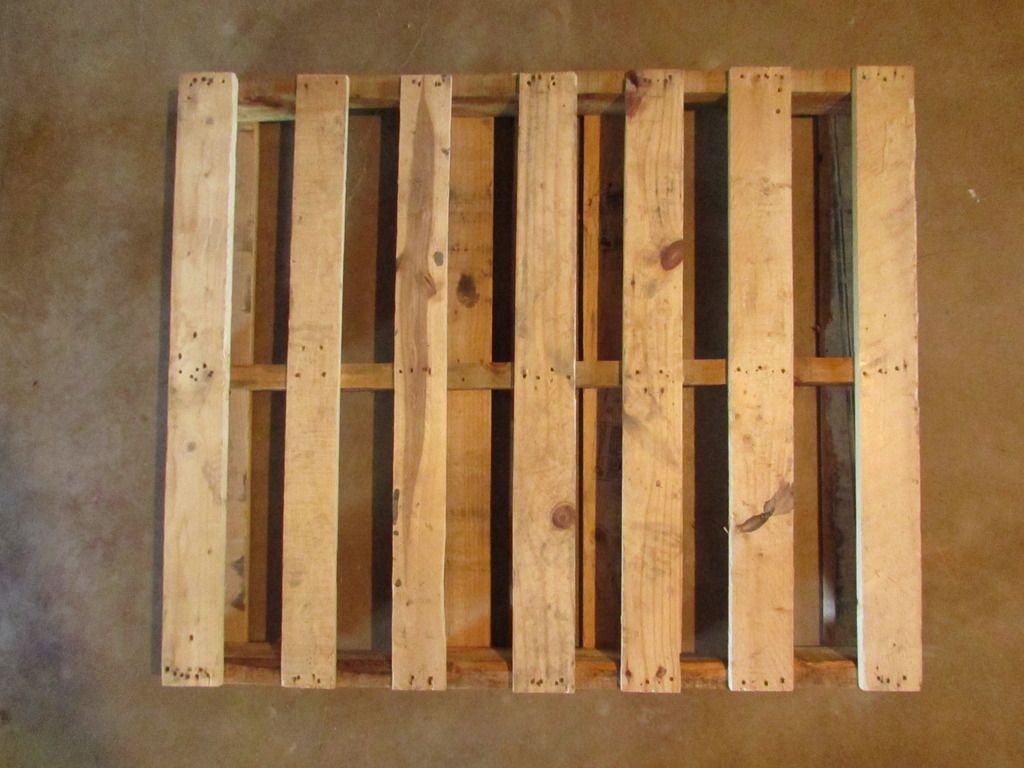
So if you take an old wooden pallet...
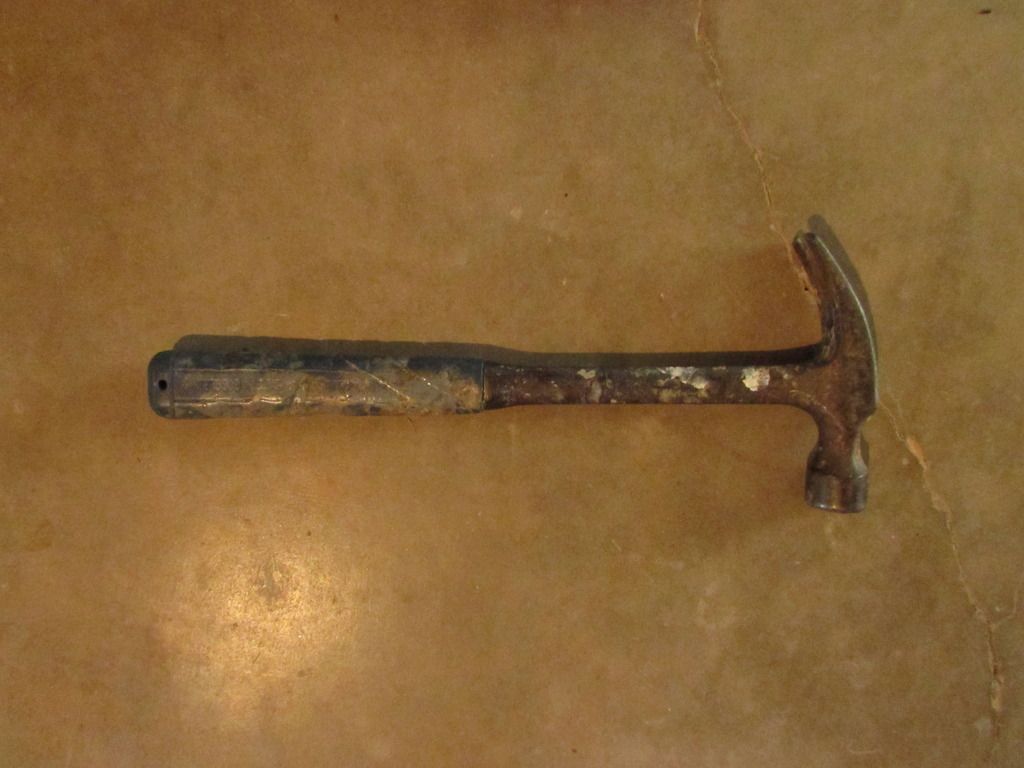
And beat the snot out of it with an old hammer...
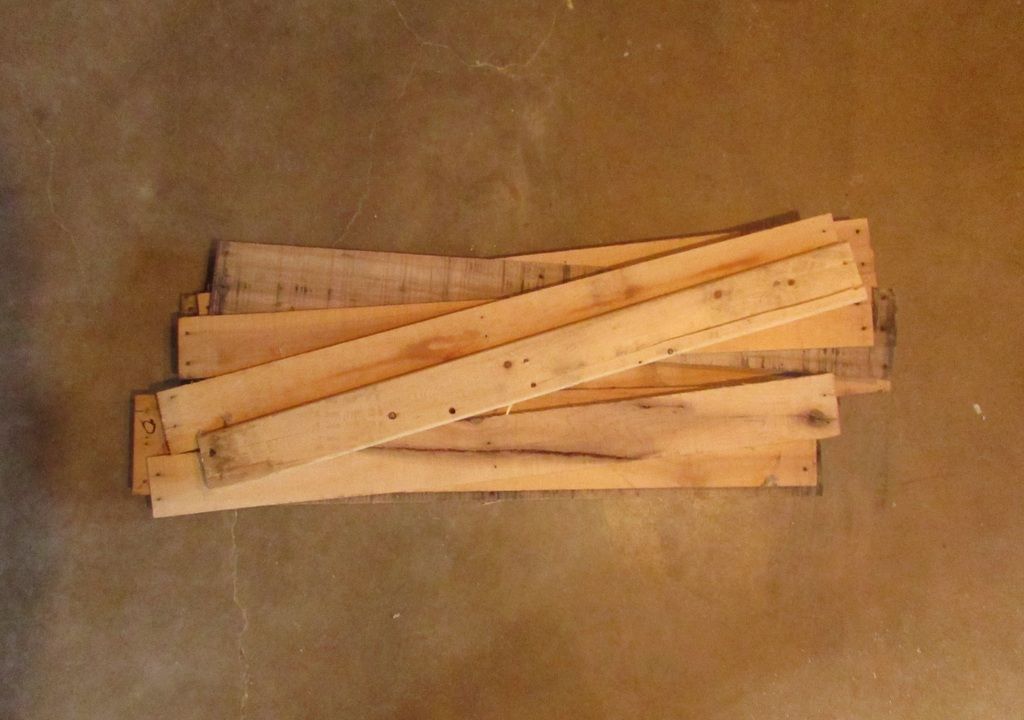
You get a pile of boards!
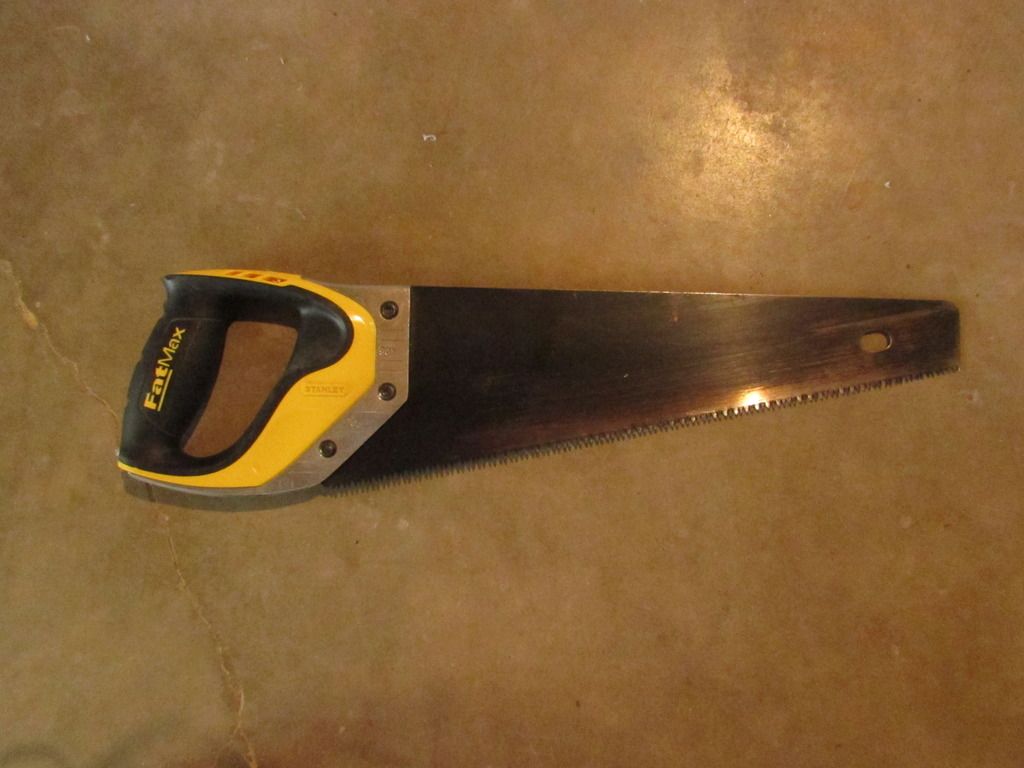
If you take the pile of boards and chop it to bits with a saw...
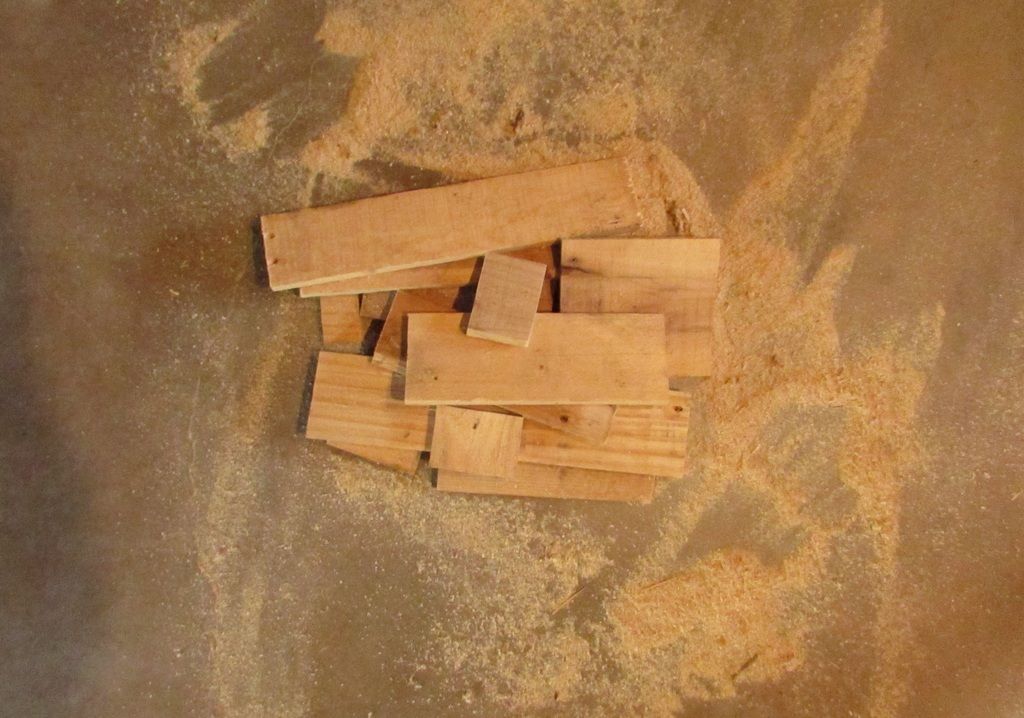
You get a pile of smaller boards! And some sawdust.
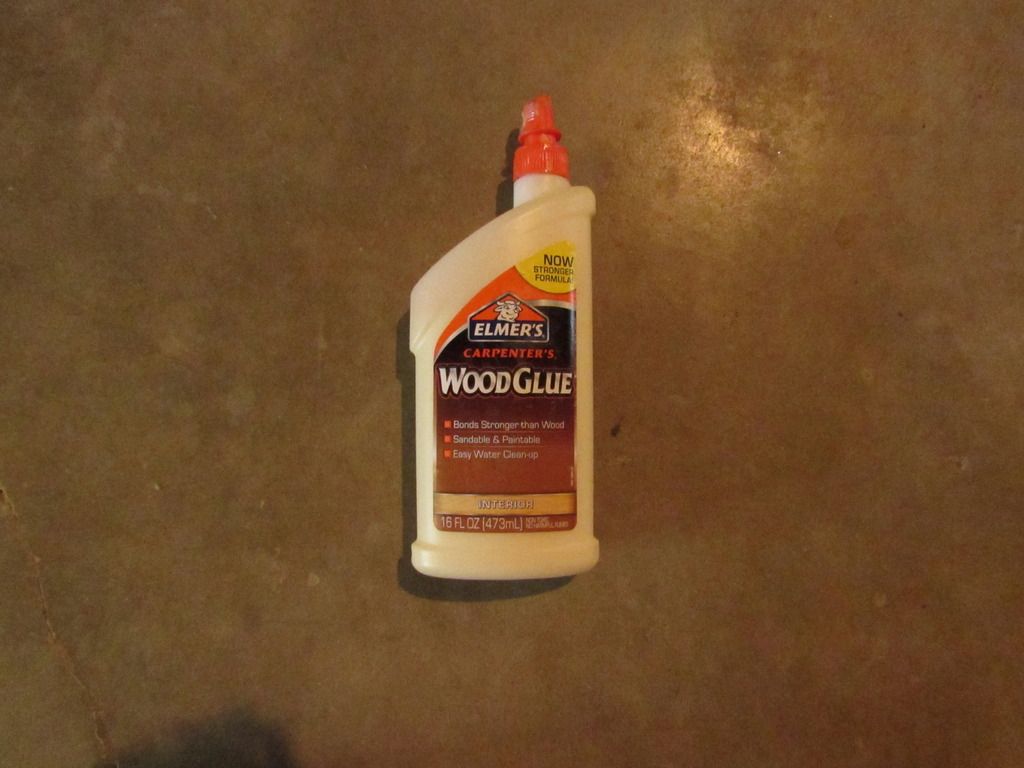
If you then take that pile of small boards, sand them down, and slap them together with some wood glue...
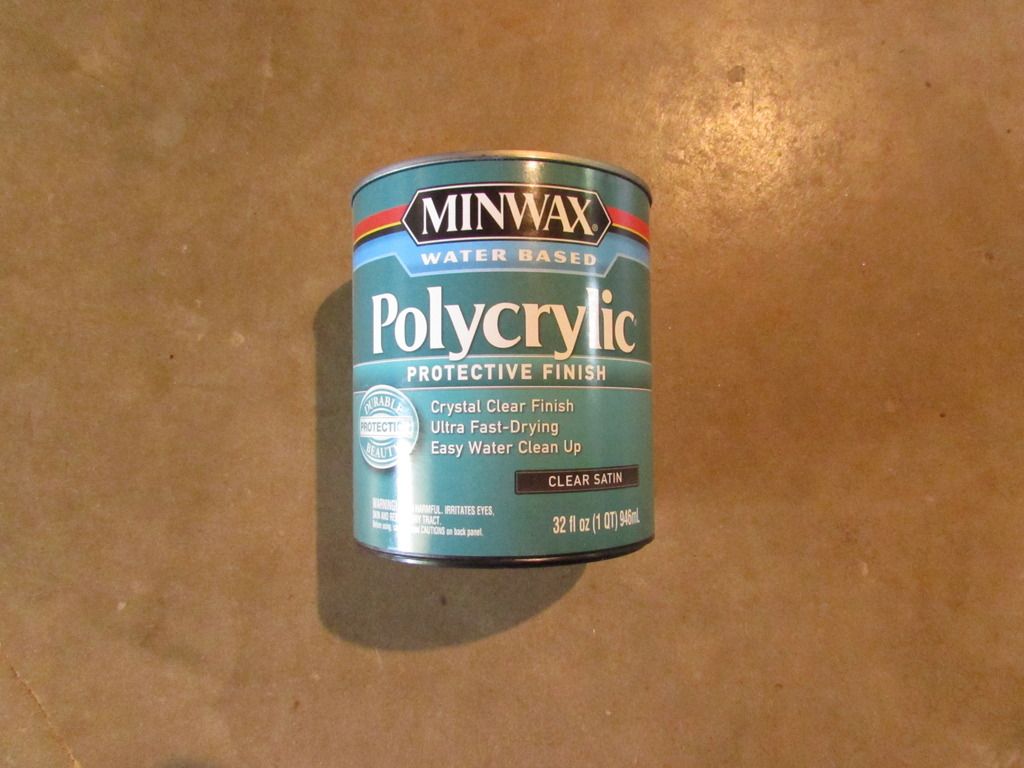
And splash them with your sealer of choice...
__________________
Science. It reduces the stupid.
Last edited by FWK; 12-07-15 at 11:40 AM..
|
|
|
|
|
12-07-15, 11:34 AM
|
#19
|
|
Member
Join Date: Mar-2014
Location: Victoria, TX
Age: 40
Posts: 774
Country:
|
DIY wood pallet snake hides
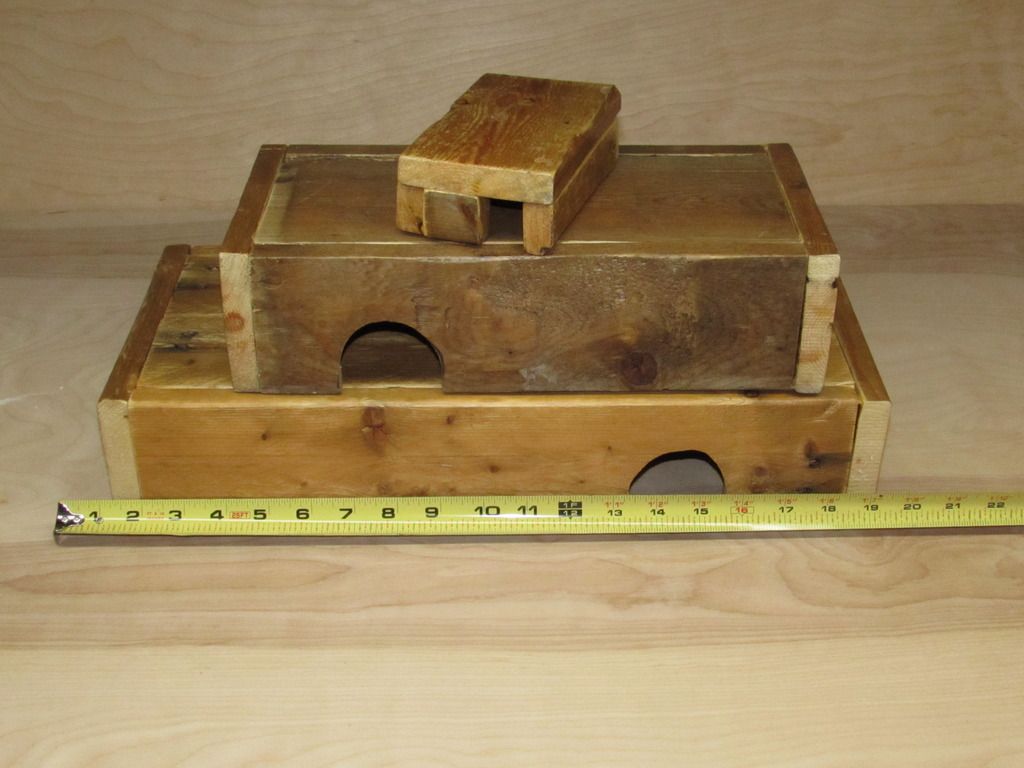
You get custom snake hides! Any size and shape you want.
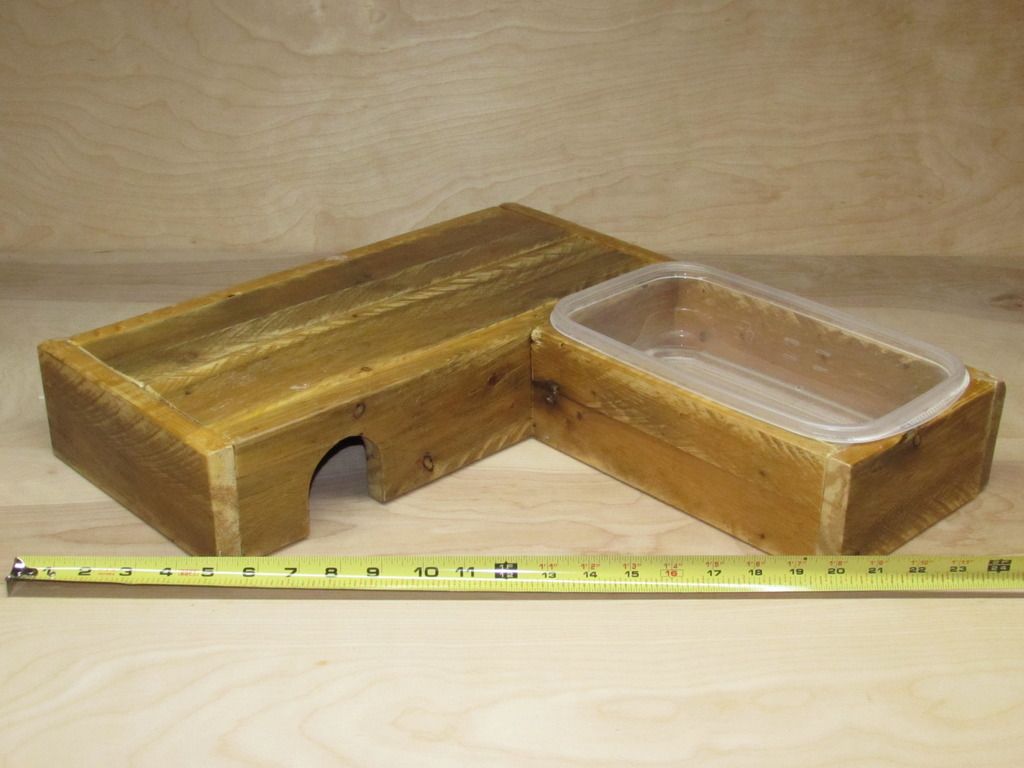
You can attach a water bowl...
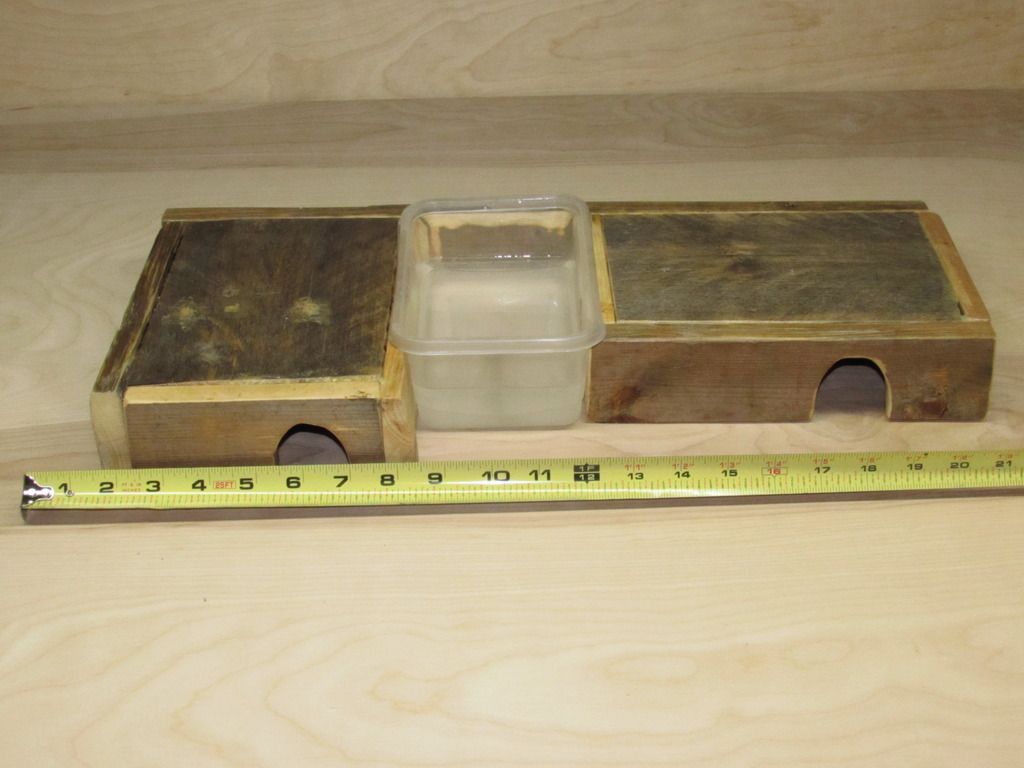
Or a couple hides with a water bowl...
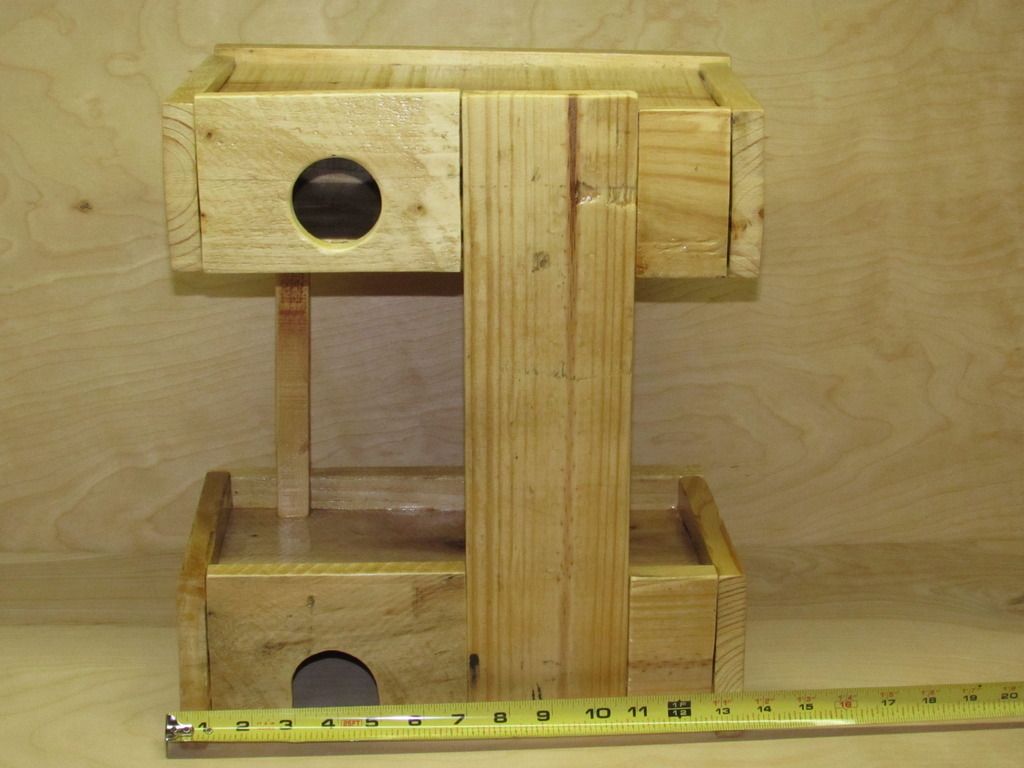
Or maybe even a second level! The back of the top hide is held on with a couple wood screws for easy access. I designed this with a lip around the top of each hide after noticing some snakes seem to spend more time on top of their hides than in them.
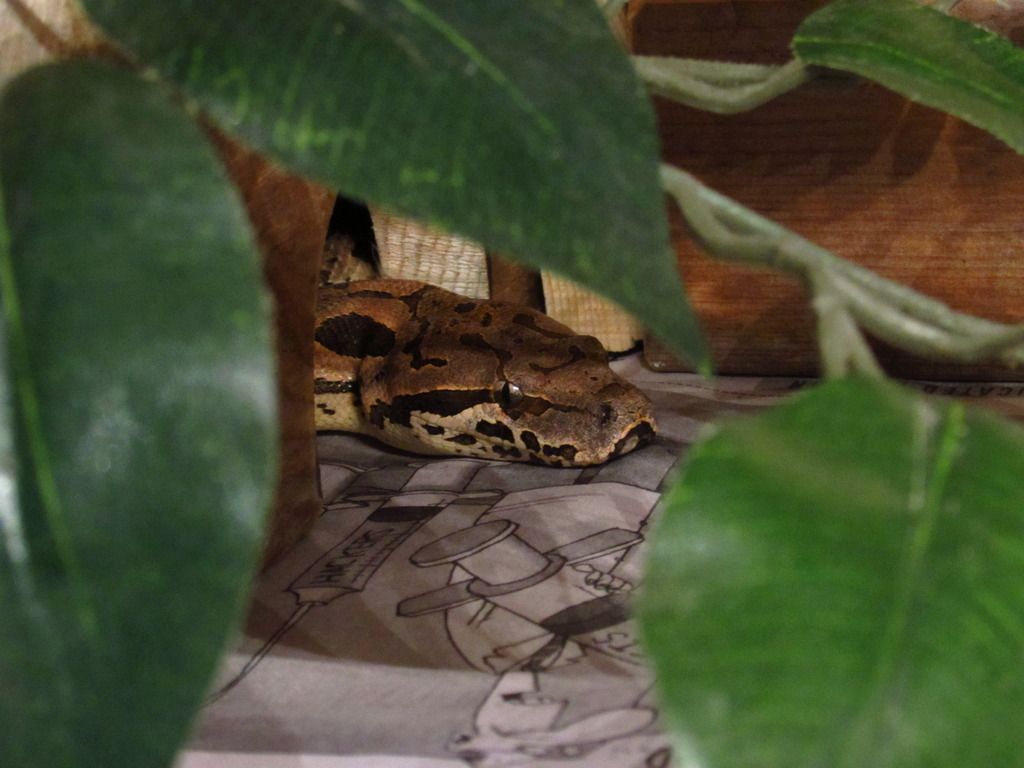
The Dumeril's Boa relaxes in his hide. These wood hides have a bit of weight to them, they are not so easy for even a heavy bodied Boa to move around. Lightweight plastic hides are nothing to this guy, he'd toss them all about the enclosure in his daily quest to drive me nuts.
__________________
Science. It reduces the stupid.
|
|
|
|
|
12-07-15, 02:40 PM
|
#20
|
|
Forum Moderator
Join Date: Dec-2014
Location: middle tn
Posts: 4,269
Country:
|
Re: FW's (mostly) DIY Snake Room. (Pic heavy)
Oh man...total....want....
Will deff be doing this for my guys at some point...especially that diuble decker!!! And I could also paint on them! SO EXCITED!
__________________
"THE Reptiholic"
I stopped counting at 30....
|
|
|
|
|
12-15-15, 08:41 PM
|
#21
|
|
Member
Join Date: Mar-2014
Location: Victoria, TX
Age: 40
Posts: 774
Country:
|
Upping my Ball Python game
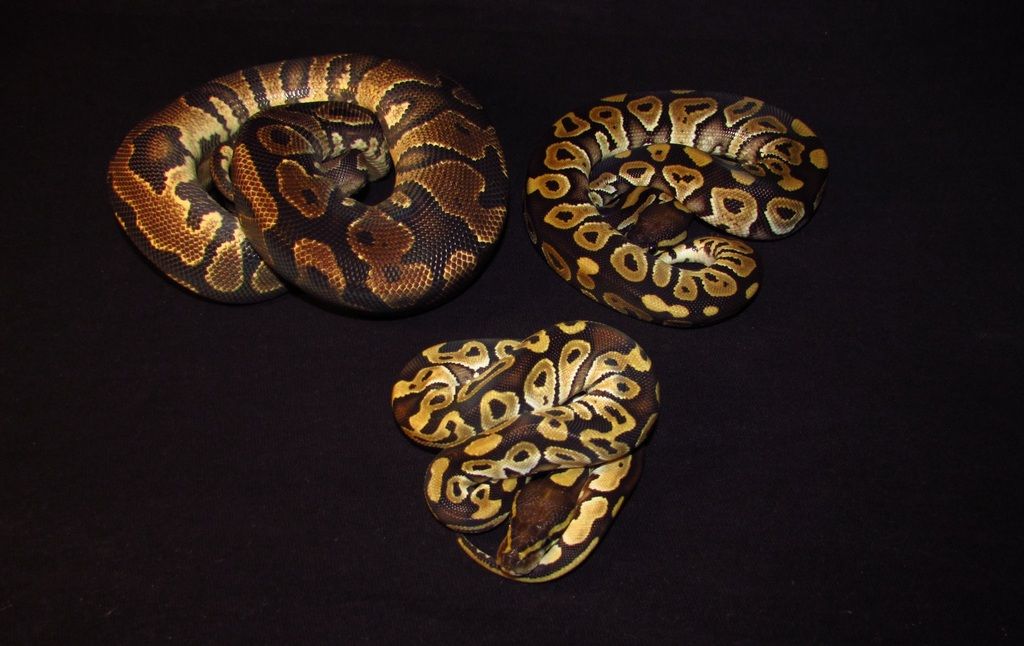
My Ball Python crew is no longer just a motley collection of rescues! I ordered a female Yellowbelly (top left, she is in deep shed), a male Mystic (top right), and a female Mojave (front and center) over the weekend and they came in today. A female Mojave has been at the top of my Ball Python wish list for a while now, very happy to finally have this little one. The Yellowbelly is a 2014, the Mojave and Mystic are hatchlings. So excited to have these genes to work with, opens up so many new possibilities! Hopefully just a few years away from taking a shot at some very cool combos like a Jigsaw, Mystic Potion, Pastel Yellowbelly, or, if I can get ahold of a male Spark, a Puma! We shall see. In other Ball Python news, my female Spider did not make weight this year so she has to wait another year. But I do have a female Normal ready to go so I'm pairing her with my Pinstripe, hoping for a female Pin to hold back. In a very happy turn of events my typically picky het Albino female has been absolutely hammering everything I put in front of her for a couple months now, if she keeps it up she will definitely be ready to go next fall. So in theory I could have the Spider, the het Albino, and my other Normal female all available next fall. Some decisions to be made. A good problem to have, I think.
__________________
Science. It reduces the stupid.
|
|
|
|
|
01-18-16, 06:51 PM
|
#22
|
|
Member
Join Date: Mar-2014
Location: Victoria, TX
Age: 40
Posts: 774
Country:
|
A 15 quart tub rack build
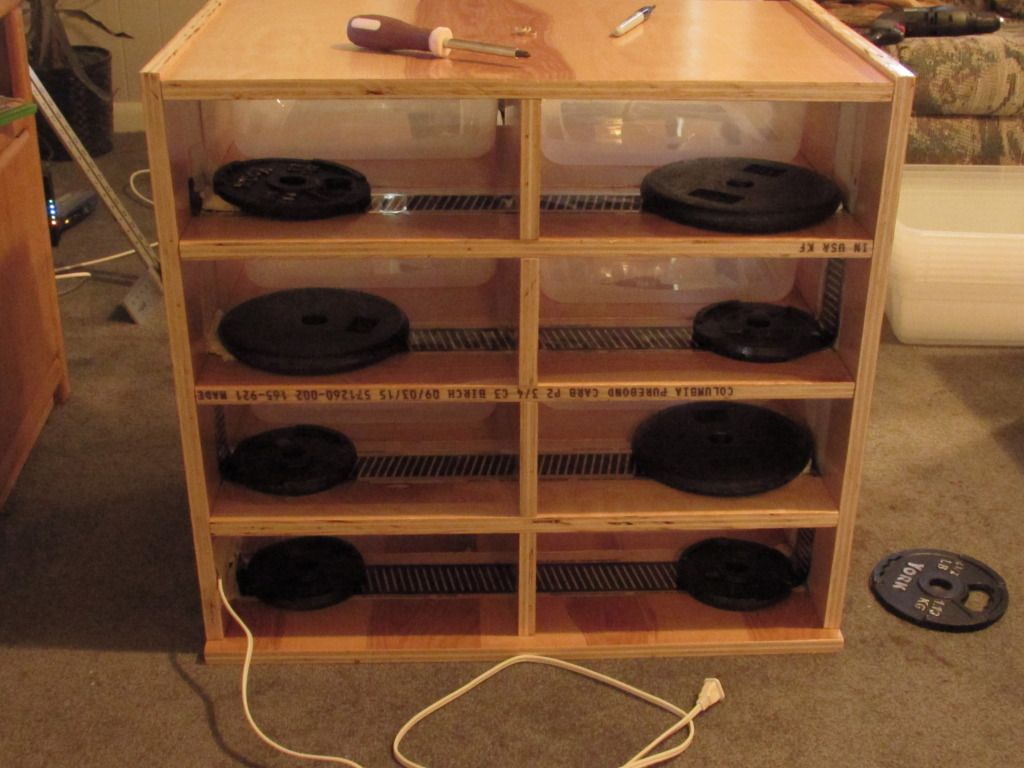
My project over the holidays this year was to build a new 15 quart tub rack. My hatchling Ball Pythons are quickly outgrowing their 6 quart tubs, and my 15 quart rack is currently occupied by colubrids. Time to expand! The 15 quart rack I have now is an eight slot Boaphile, it was the first rack I ordered a few years ago. It is a great rack, came in fully assembled with tubs and all ready to plug and play, but it sells for almost four hundred dollars and I figure to build one for about $150. The new rack will sit right where the Boaphile currently sits, tucked in the comer next to the three enclosures there. The Boaphile will stack on top on the new rack.
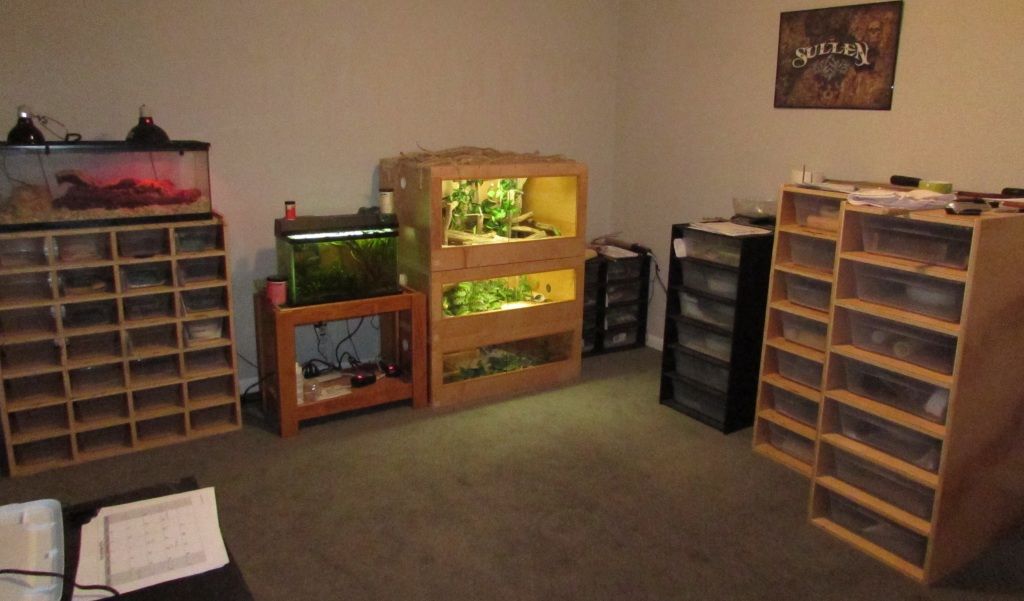
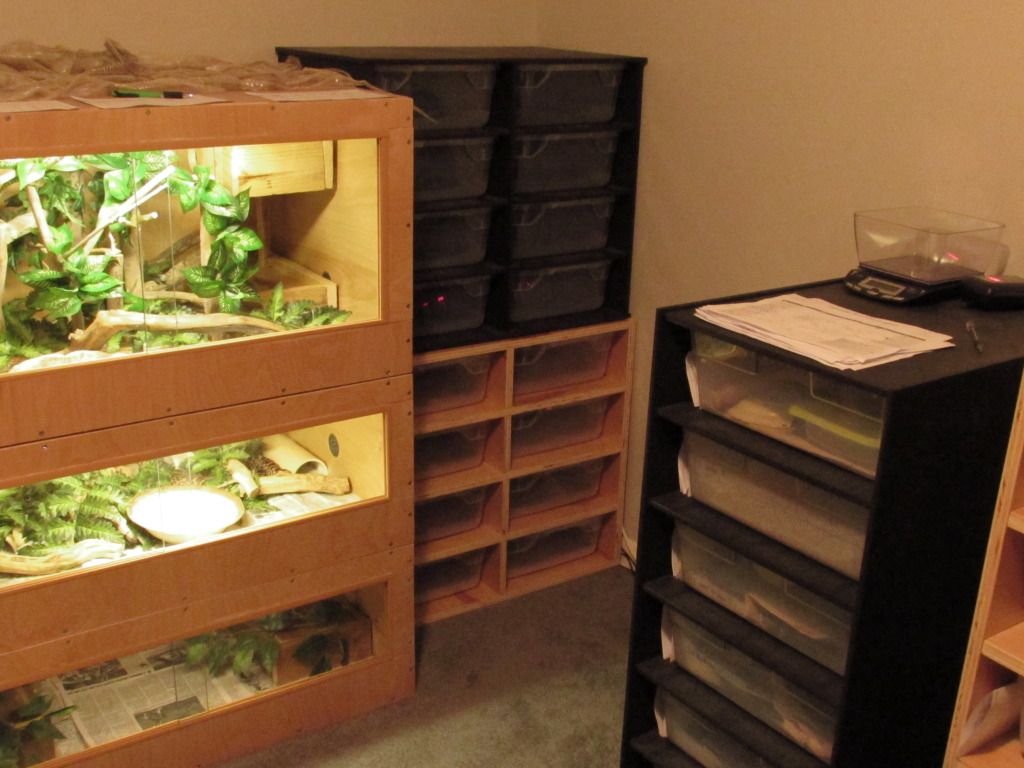
A little bit about what else is going on in the snake room: The 6 quart hatchling rack is on the far left, the aquarium on top of the rack houses a friends Corn Snake. He is currently living in an apartment that doesn't allow snakes (sure he can have a dog or cat, with all the hair, dandruff, noise, smell, and potential property damage that comes along with such pets, but not a silent, odorless, hypoallergenic Corn Snake. Makes a lot of sense eh) so I've been babysitting for better than a year now. I really hate the enclosure, but it is his animal and set up so what are you gunna do. The aquarium next to the hatchling rack is a Walstad style ten gallon that has been running for some five years with no input from me other than to feed the fish and occasionally remove overgrown plants. It is stagnant, lit with a small florescent light, and stocked with small, self-regulating breeding colonies of Mosquito Fish, Ghost Shrimp, three species of aquatic Snails, and countless microfauna. It is stuffed with Anubias, Crypts, Java Ferns, Java Moss, Four Leaf Clover (Marsilea hirsuta), and Dwarf Water Lettuce. I used to have a high light, Co2 injected 50 gallon, but holy cow was that thing a lot of work to maintain. As pretty as it was to look at I was relieved to shut it down. I recently acquired a 40 gallon breeder, hopefully I'll have time this spring to build a stand for it and get it running. It will be a Walstad style much like the ten gallon, only larger and with much more biodiversity. Once the 40 gallon is set up, it will be in the living room, I'll transfer everything in the 10 gallon to the 40 gallon and rearrange the snake room, as everything is currently placed around the tank. Next to the fish tank are three enclosures I built last year, a fourth is in the works. Then the 15 quart Boaphile that will sit on top of the new rack. On the right wall is a 28 quart Boaphile rack, a 28 quart plywood rack, and a 41 quart plywood rack. Near future projects include another 41 quart plywood rack and some electrical work to bring in more power to the snake room, which means I get to spend time crawling around in my cramped little attic. Because that is just so much fun. I re-insulated my attic years ago, I really do not want to spend any more time up there. But the additional power will be needed for what I have planned over the next few years. Side note, the Sullen poster was left there by a former roommate many years ago. I'd like to have some herp related posters and what have you to decorate the walls, but it seems silly to spend money on pictures that could be spent on snakes and equipment. Maybe one of these days.
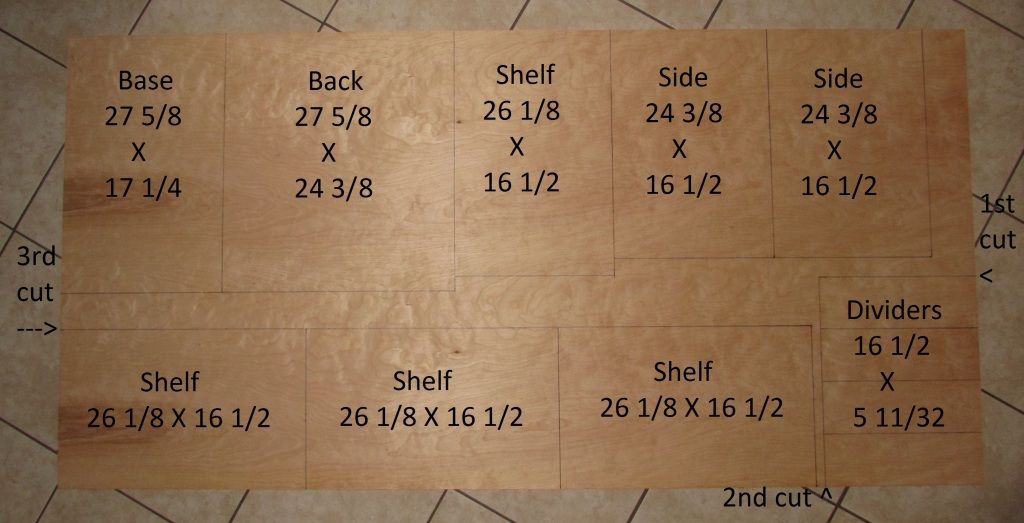
The whole rack can be cut from a single 4x8 foot sheet of plywood! How convenient. Make sure to account for the width of the saw blade when drawing out your cuts or things can get wacky. I forgot to keep this in mind when I built my first individual enclosures, but I was able to make adjustments during assembly to accommodate the poorly cut pieces. Racks would not be so forgiving, what with the tight clearances necessary to fit the tubs properly. The lines are drawn 1/16" thick to accommodate the hollow ground, 7 1/4" x 140 tooth plywood blade on my circular saw. The first couple of cuts here are a bit tricky because you need to get the dividers out of the way, but everything after that is just straight through cuts. After the third cut start splitting the individual parts and trimming them as necessary. Measurements are in inches. The dividers are a bit tall so they can be sanded down to a perfect fit. If you have a nice table saw, or more skill with a circular saw than I do, you may be able to get away with cutting them closer. Just remember you can always remove more material later, but you can't add any back. The final gap for the tubs needs to be around 5 5/16".
Materials list:
One 4x8 foot, 3/4 inch thick sheet of plywood. I use Birch, you can use Maple or Oak if you'd like to get a bit fancier.
One quart Minwax water based polyurethane. You can get really fancy with stains and what have you if you'd like, but I keep it simple.
One 75 count box of 1.5 inch #8 wood screws
Eight 15 quart Rubbermaid sweater boxes
10.5 feet of three inch heat tape
Two heat tape connectors
One small extension cord
Silicon to tack the heat tape down
Electrical tape
And, of course, you'll need a thermostat to regulate the heat tape
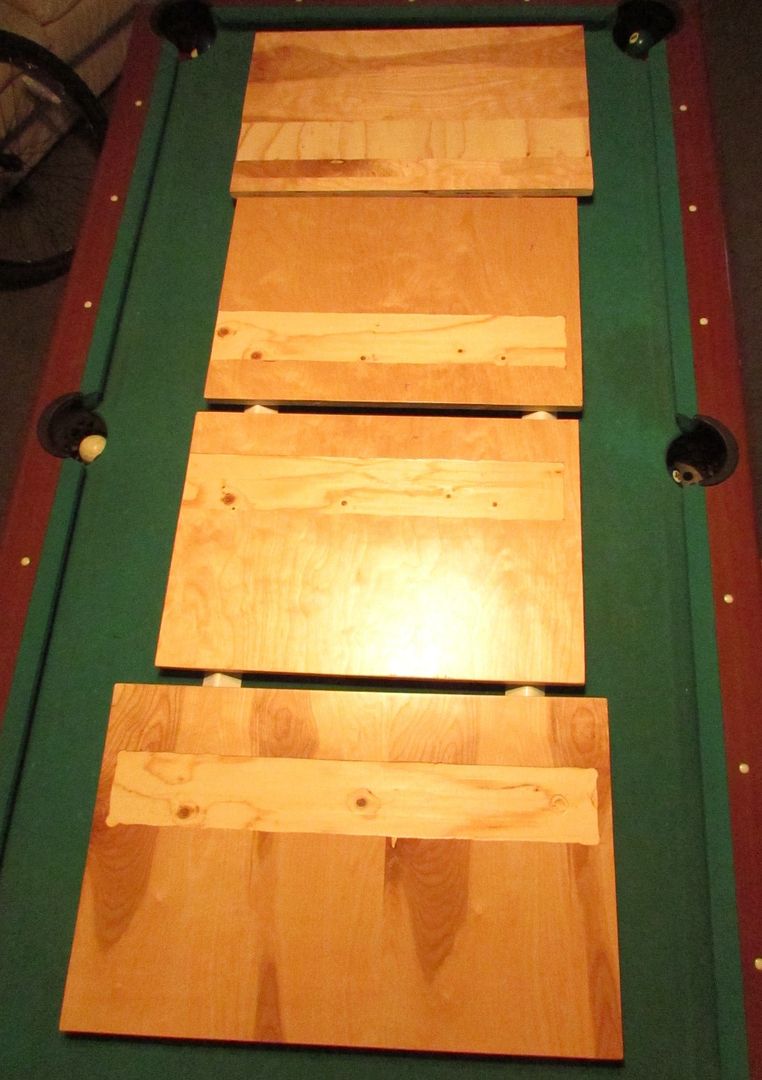
Some of the pieces laid out on my little old pool table to dry after a coat of polyurethane. Two coats, a light sanding, and one final coat does the trick. You can see the shallow channels cut with a router to lay the heat tape in. The channel starts about three inches from the back of the shelves (3 3/4" from the back of the base) and is about three and a half inches wide. The base (closest to the camera) is routered to about 3/4 of an inch on each side, the sides (the two pieces in the middle) are routered all the way from the bottom to about one inch from the top, and the three shelves (one shelf is at the far end of the table) are routered all the way across.
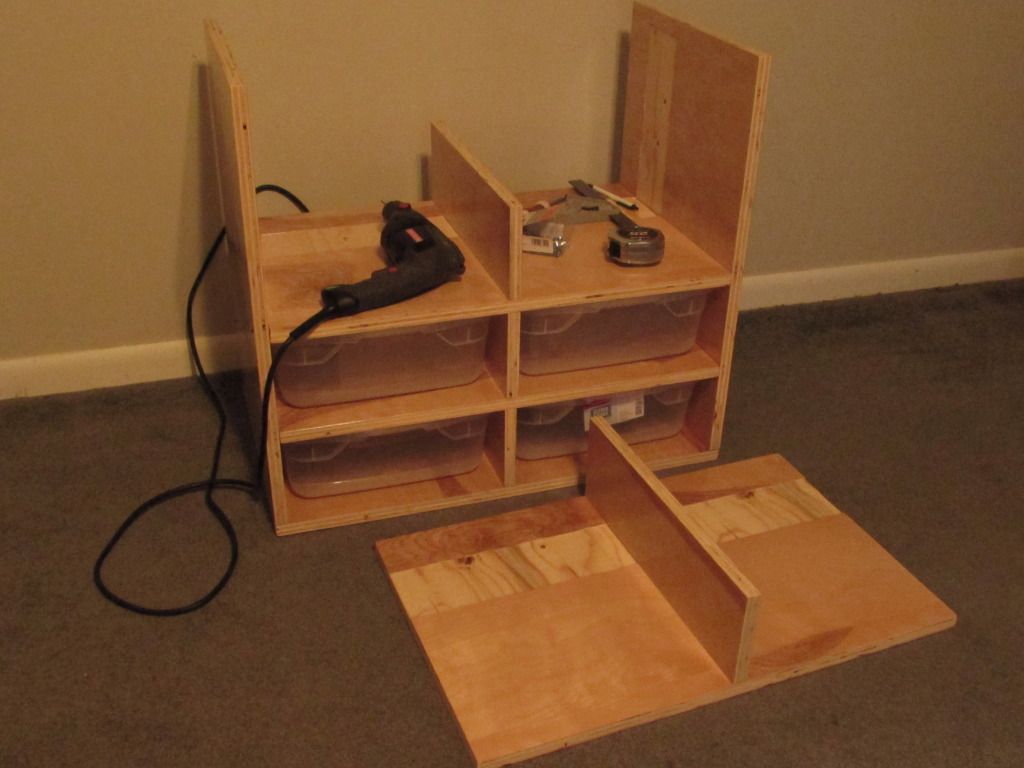
Construction in progress! I first attached the dividers to the base and three shelves using three screws each (use a 1/8" bit to drill pilot holes for all screws). Then attached the sides to the base, again using three screws each, and began stacking the shelves in place one by one, carefully test fitting tubs and making adjustments as necessary. Three screws through both sides into each shelf and the top, and the primary assembly is complete.
Once all the shelves are in place it is time to install the heat tape. Lots of guides are available online on working with heat tape so I wont go into too much detail. Basically I cut the head off of a small extension cord, attached a heat tape connector to each lead with a bit of solder, attached the connectors to the heat tape (I don't have the fancy specialty heat tape connector crimping pliers, so I just crimp them with regular pliers then place them on a hard surface and tap them with a hammer until I'm satisfied they're well set), then seal everything up with electrical tape. For this application I cut the leads to different lengths so it is easy to run the wire out the back of the rack. Here the heat tape is in place and weighed down as the silicon sets.
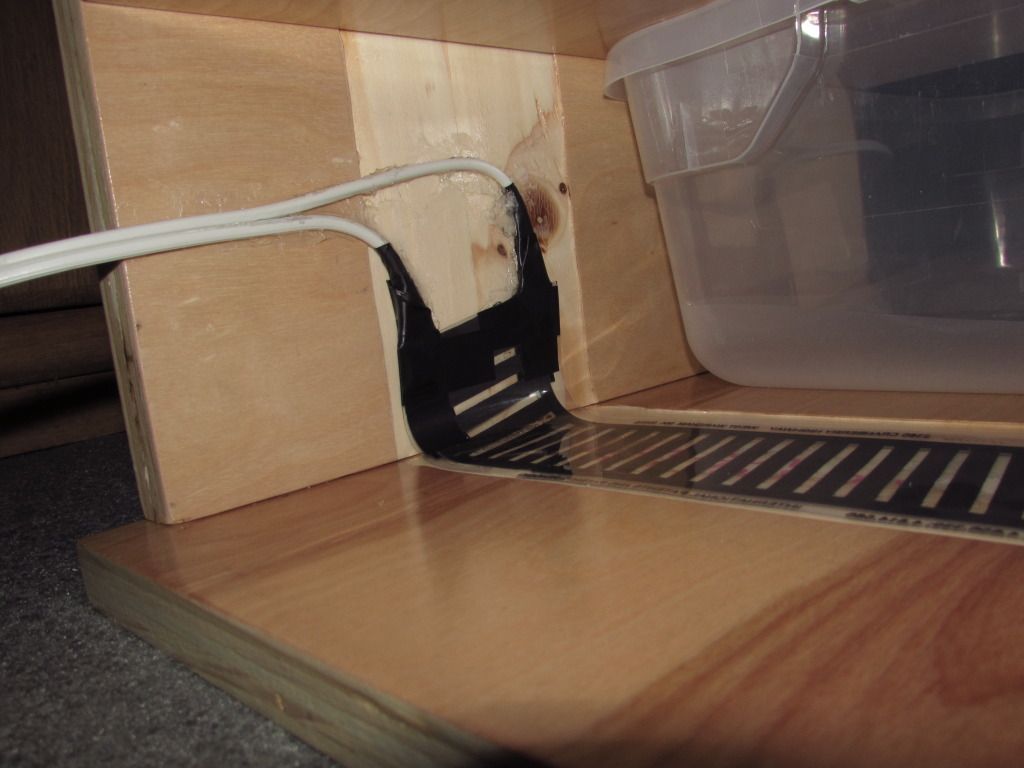
Detail of the heat tape wire installation, you can see how the different length leads allow the wire to be easily run through the back of the rack. The wire is held in place with silicon, I use masking tape to hold the wire in place while the silicon sets.
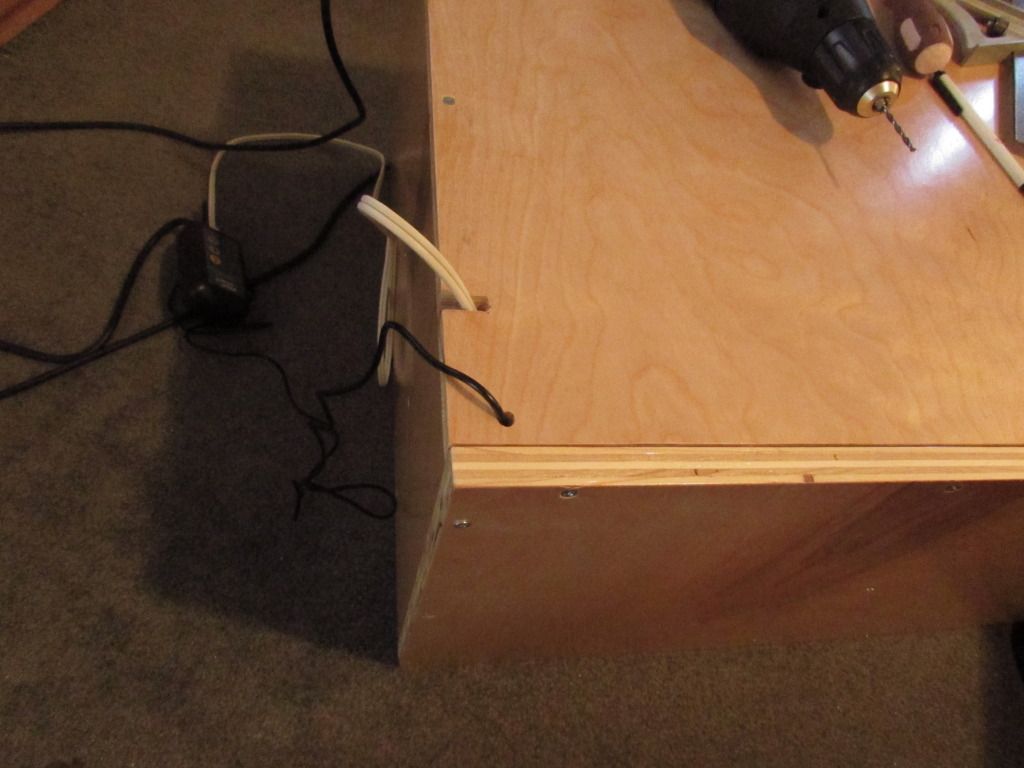
The last piece of this puzzle is the back. I wait until the heat tape is installed to cut the slot for the wire, gives me maximum flexibility while installing the heat tape. You also need to drill a hole just big enough for the thermostats probe to slip through. A 1/4 inch bit does the trick in this case. A couple quick coats of polyurethane to seal the freshly exposed wood and you're ready to install the back and fire up the heat tape.
The new rack tucked away in its place. Once the temperatures stabilized the critters were moved in. On to the next project!
__________________
Science. It reduces the stupid.
Last edited by FWK; 01-18-16 at 06:59 PM..
|
|
|
|
|
01-19-16, 12:40 AM
|
#23
|
|
Member
Join Date: Dec-2015
Posts: 2,203
Country: 
|
Re: FW's (mostly) DIY Snake Room. (Pic heavy)
Just catching up on this thread. Lovely set up your built there. I think I may try my hand at building a viv when my BCI requires a slightly bigger home.
Also I really like you pallet hides. I've done some truck driving recently and pallets have been the bane of my life but I can see me wanting a couple to have a play with.
__________________
0.1 B imperator, 1.0 M spilota harrisoni, 1.0 C hortulanus, 2.1 P reticulatus (Madu locality), 1.1 S amethystine, 1.1 L olivaceous, 1.0 C angulifer, 1.0 Z persicus, 0.1 P regius, 0.1 N natrix, 0.1 E climacophora, 1.0 P obsoletus, 0.1 L geluta nigrtia, 1.0 P catenifer sayi, 1.0 T lepidus
|
|
|
|
|
01-19-16, 02:36 AM
|
#24
|
|
Member
Join Date: Apr-2015
Location: Ca. USA
Posts: 128
Country:
|
Re: DIY Snake Hooks!
I did the same thing with a bbq fork except I left it full length the other hook is from Bean Farm
Amazon.com: 24 Inch Small Snake Hook: Patio, Lawn & Garden . Handling Equipment - The Bean Farm <--- bought it here Im gonna try the golf club paint roller hook great idea
Last edited by Princess-dad; 01-19-16 at 02:43 AM..
|
|
|
|
|
01-19-16, 09:53 PM
|
#25
|
|
Member
Join Date: Mar-2014
Location: Victoria, TX
Age: 40
Posts: 774
Country:
|
Re: FW's (mostly) DIY Snake Room. (Pic heavy)
@dannybgoode, excess pallets are a problem where I work too. One of my coworkers also uses them for his own projects, so he and I are always competing for the nicest pallets.
@Princess-dad, I have that same hook from The Bean Farm! It was basically an impulse buy a while back, I was poking around the site before finalizing an order of heat tape and other supplies. When it came in I looked it over and figured it wasn't bad for ten bucks, but I could probably repurpose something for less. Was doing a little hunting one day while picking up some groceries when I came across the campfire hook. As for the Bean Farm hook, I wound up removing the wire they had wrapped around the handle (how am I supposed to clean that?) and sealing the wood with a few coats of polyurethane. Now it can be washed with soap and water or even dipped in bleach, should it need sterilizing.
__________________
Science. It reduces the stupid.
|
|
|
|
|
03-01-16, 09:33 PM
|
#26
|
|
Member
Join Date: Mar-2014
Location: Victoria, TX
Age: 40
Posts: 774
Country:
|
Simple DIY snake hides
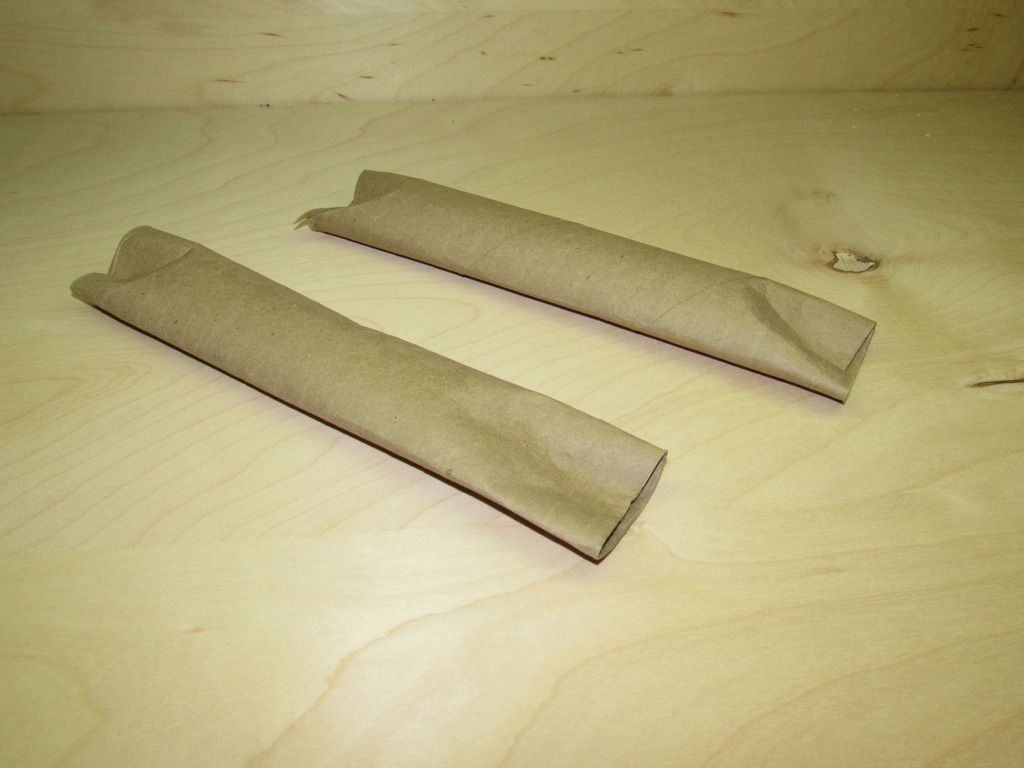
Everybody knows about the paper towel roll hides. I usually flatten them a bit, crimp the ends, and stuff bits of crumpled up newspaper in them for extra security.
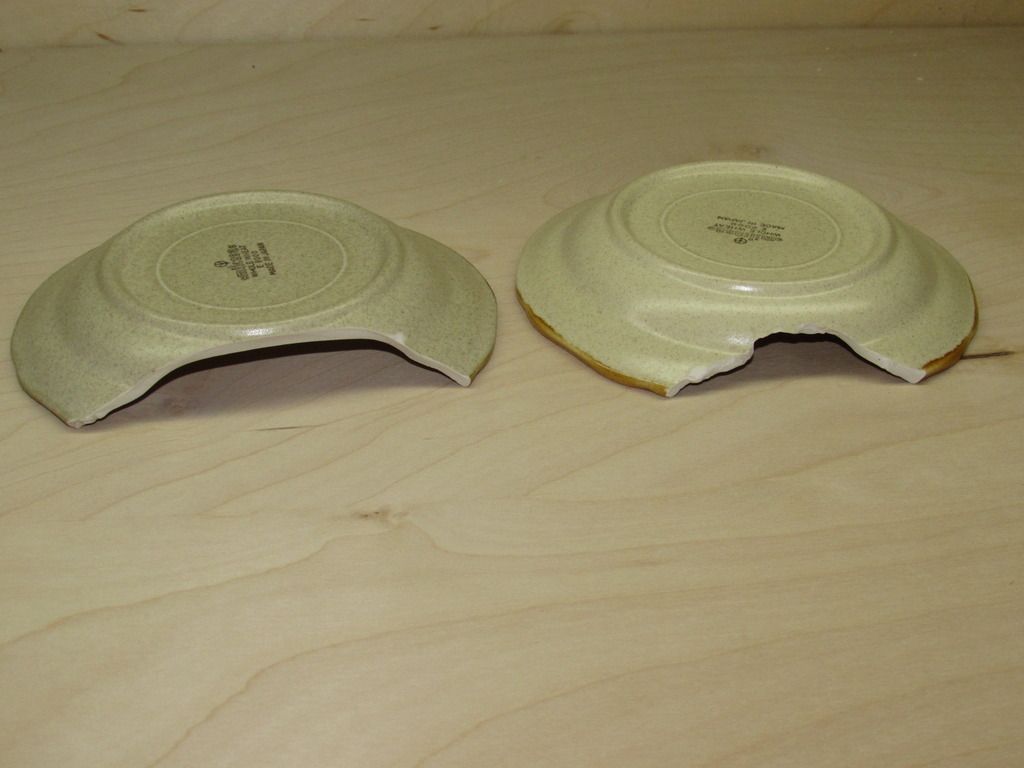
Old, unused dishes? Snakes can make use of them. These plates were a bit tricky to break. The plate on the right was carefully chipped away bit by bit, the plate on the left broke away clean just the way it is with the first tap of the hammer. I ruined a few of them when they split cleanly in two, or shattered into many small pieces. But when they break right they make great warm hides.
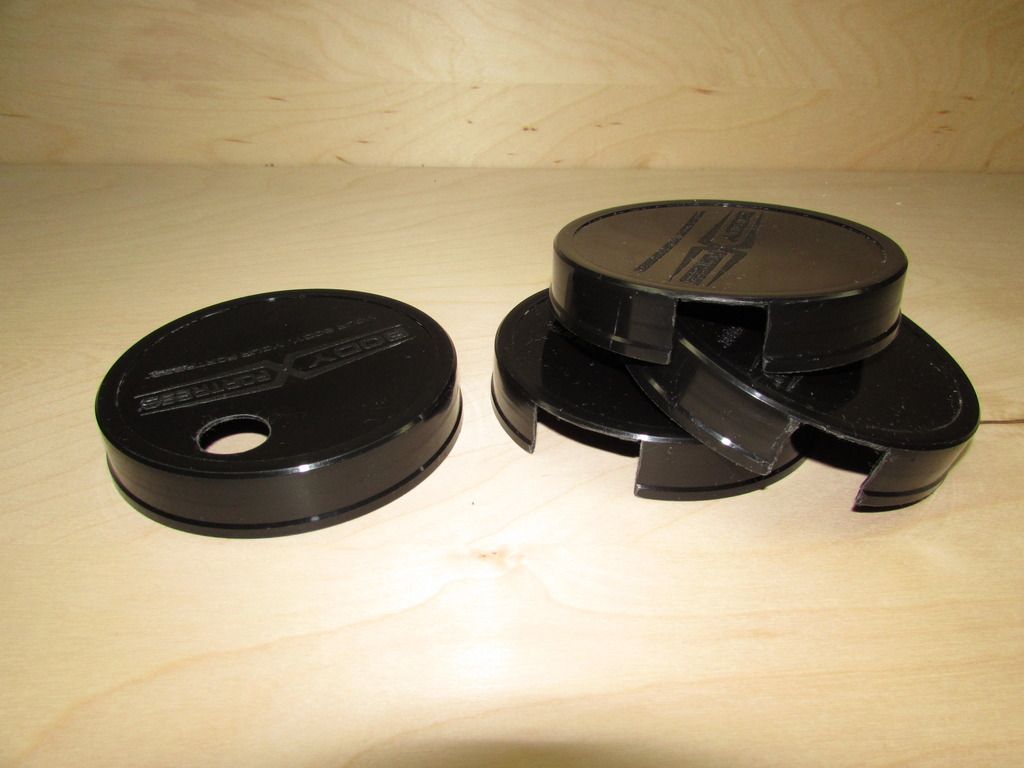
The lids of plastic containers make great hides. Some snakes prefer to get down into a hide with a hole drilled through the top, some prefer the hides with the side cut out. Some don't want an entrance at all, just set the lid down upside-down and the snake will coil up in it. My Rat Snakes in particular seem to favor the upside-down lid. Especially with a bit of cover overhead, such as artificial plants.
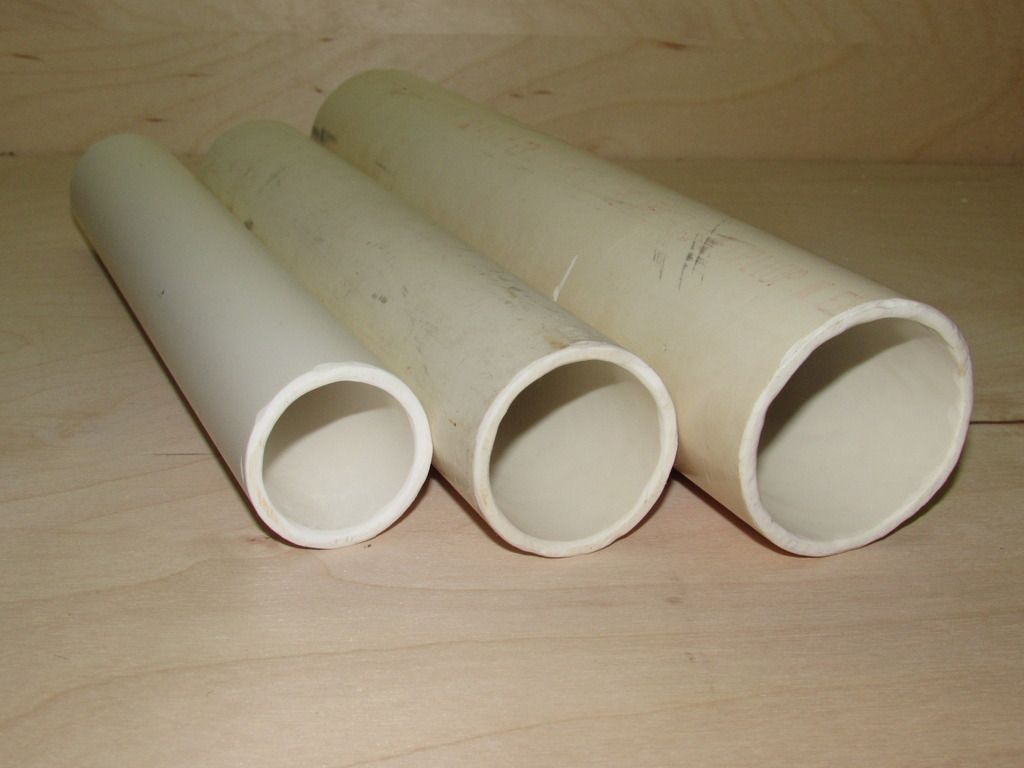
Sections of old PVC pipe make for great hides as well. Again, stuffing them with bits of crumpled up newspaper can make them more appealing to some snakes.
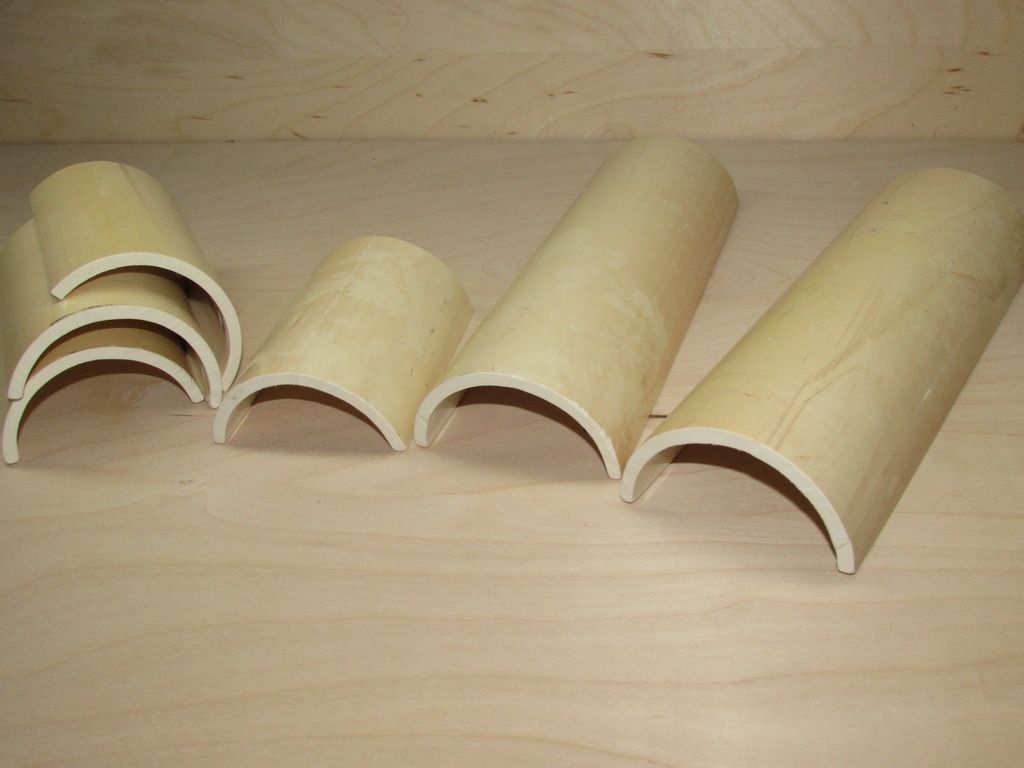
You can split the PVC pipe down the middle for hides that wont roll around.
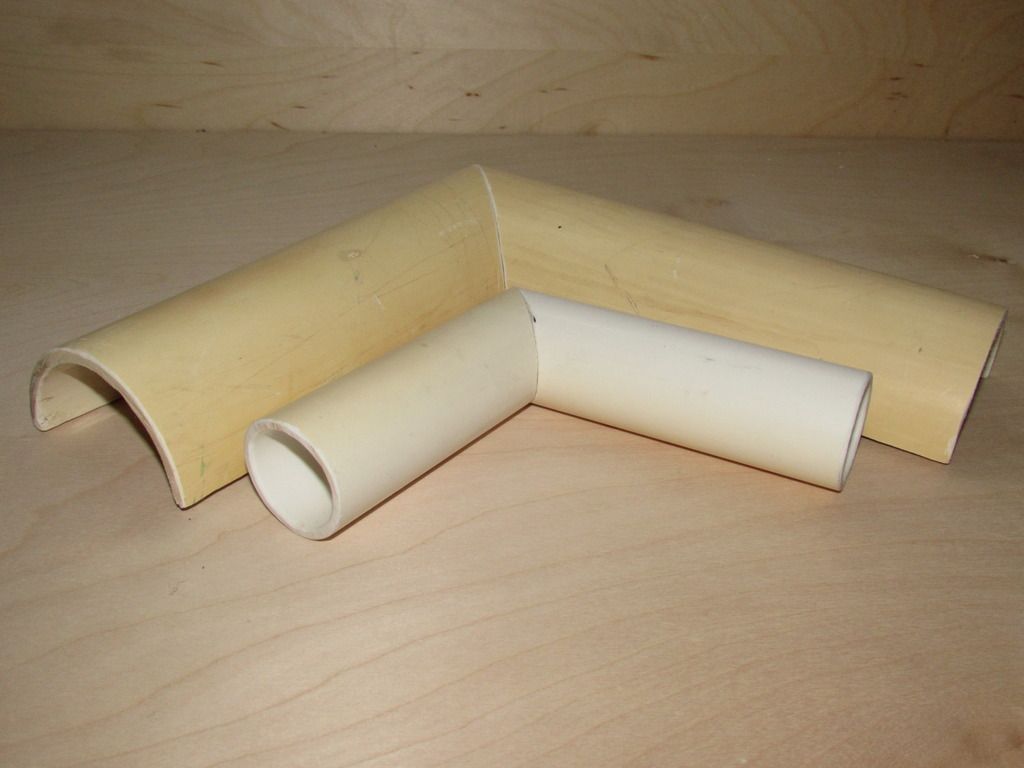
Or even cut them at 45 degree angles and glue them back together to make corner hides.
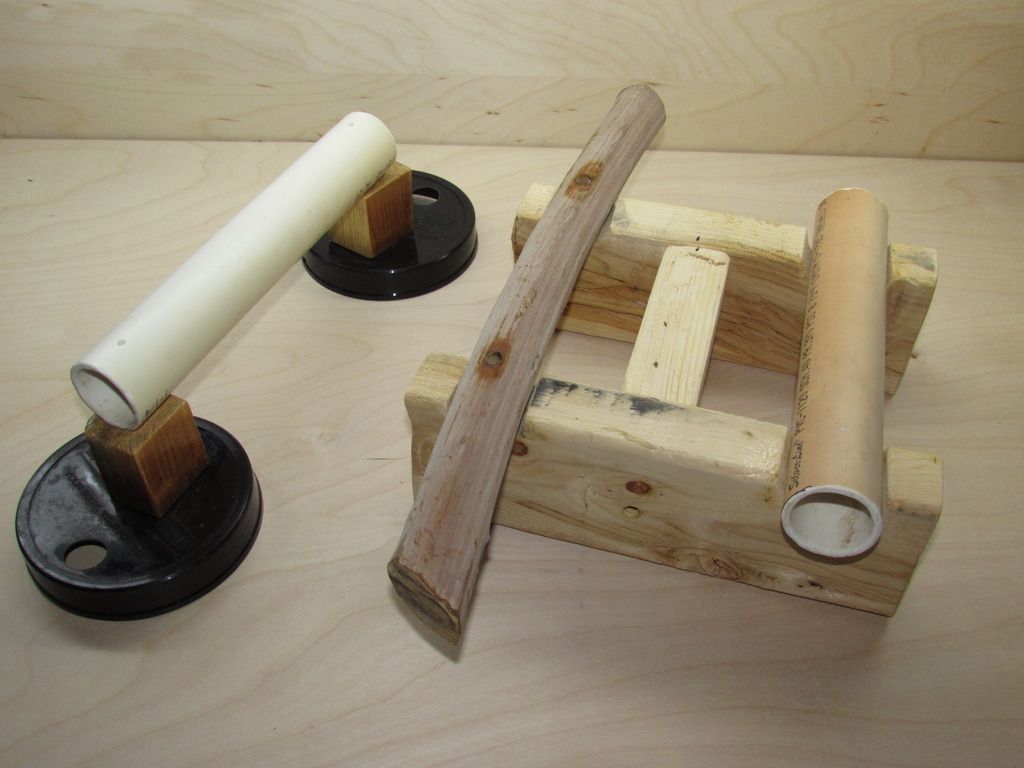
If you want to get a bit more creative you can start combining parts. These slightly elevated hides have proven to be very popular with my juvenile Water Snakes and Rat Snakes. The one on the right was designed specifically to take up a lot of space in a 28 quart tub, while creating usable vertical space and multiple zones within the relatively small tub. An added benefit to building these types of hides is the additional weight and stability. The simple plastic lid hides are great, but very easy for snakes to move. With features like these you are much more likely to find things more or less the way you left them.
__________________
Science. It reduces the stupid.
|
|
|
|
|
03-01-16, 09:58 PM
|
#27
|
|
Member
Join Date: Feb-2016
Age: 28
Posts: 133
Country:
|
Re: FW's (mostly) DIY Snake Room. (Pic heavy)
Wow! I love this thread, and your idea of making hides from wood palettes and pvc is awesome!! If I may ask, where do you buy all of your tubs/how many different sizes do you have?
__________________
1.0 Bearded Dragon (Bluegrass) 1.0 Bay of LA Rosy Boa (Pyro) 0.1 Yucca Valley Rosy Boa (Athena) 1.0 Sinaloan Milk Snake (Max) 0.0.1 Leopard Gecko (Sneaky) 0.0.1 Long Tail Lizard (Floki) 1.0 Pastel Butter het. Genetic Stripe BP (Twister)
|
|
|
|
|
03-01-16, 10:23 PM
|
#28
|
|
Member
Join Date: Mar-2014
Location: Victoria, TX
Age: 40
Posts: 774
Country:
|
Re: FW's (mostly) DIY Snake Room. (Pic heavy)
Quote:
Originally Posted by mysticmoon

If I may ask, where do you buy all of your tubs/how many different sizes do you have?
|
I have racks for 6, 15, 28, and 41 quart tubs. I bought all the tubs from Target or Walmart. The 15 quart Rubbermaid tubs I used in the 15 quart tub rack build I couldn't find in any store near me, so I ordered them from Walmart's web site.
__________________
Science. It reduces the stupid.
|
|
|
|
|
03-01-16, 10:28 PM
|
#29
|
|
Member
Join Date: Feb-2016
Age: 28
Posts: 133
Country:
|
Re: FW's (mostly) DIY Snake Room. (Pic heavy)
Good to know, thank you.
__________________
1.0 Bearded Dragon (Bluegrass) 1.0 Bay of LA Rosy Boa (Pyro) 0.1 Yucca Valley Rosy Boa (Athena) 1.0 Sinaloan Milk Snake (Max) 0.0.1 Leopard Gecko (Sneaky) 0.0.1 Long Tail Lizard (Floki) 1.0 Pastel Butter het. Genetic Stripe BP (Twister)
|
|
|
|
|
03-18-16, 06:44 PM
|
#30
|
|
Member
Join Date: Mar-2014
Location: Victoria, TX
Age: 40
Posts: 774
Country:
|
Re: FW's (mostly) DIY Snake Room. (Pic heavy)
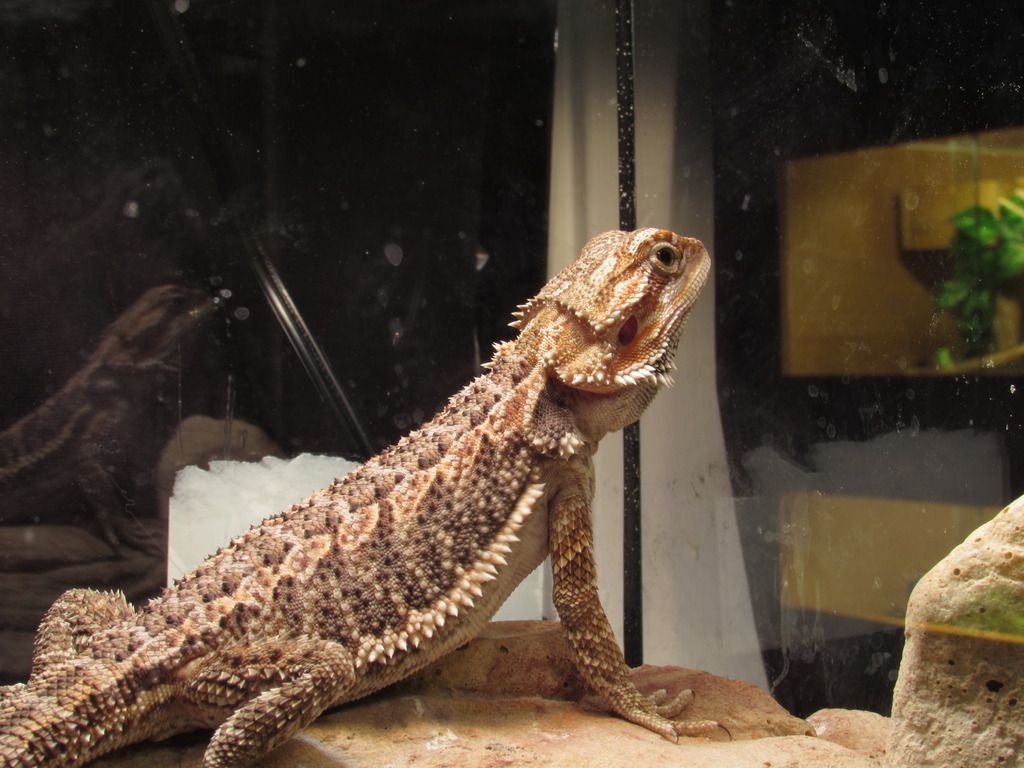
A friend of mine is headed out of town for the weekend and asked me to watch his Bearded Dragon for him. So I get to observe this little critter for a few days. Watching it murder Superworms is pretty cool, makes me miss the Green Anoles I kept as a kid.
__________________
Science. It reduces the stupid.
|
|
|
|
 Posting Rules
|
You may not post new threads
You may not post replies
You may not post attachments
You may not edit your posts
HTML code is Off
|
|
|
All times are GMT -6. The time now is 10:33 AM.
Powered by vBulletin®
©2000 - 2025, Jelsoft Enterprises Ltd.

Copyright © 2002-2023, Hobby Solutions.
|
 |


 Linear Mode
