|
|  |
| Notices |
Welcome to the sSnakeSs community. You are currently viewing our boards as a guest which gives you limited access to view most discussions and access our other features. By joining our free community you will have access to post topics, communicate privately with other members (PM), respond to polls, upload content and access many other special features. Registration is fast, simple and absolutely free so please, join our community today! If you have any problems with the registration process or your account login, please contact contact us.
|
 08-02-15, 01:17 PM
|
#1
|
|
Member
Join Date: Mar-2014
Location: Victoria, TX
Age: 40
Posts: 774
Country: 
|
FW's (mostly) DIY Snake Room. (Pic heavy)
As the title suggests this thread will be about my snake room, its inhabitants, and my many snake related DIY projects. I am very much about function over form so my projects are not pretty, there are no fancy trims or wood stains, but they are functional, durable and built to last a very long time. Feel free to steal any idea you see here, ask questions, or offer suggestions on how to improve any given project.
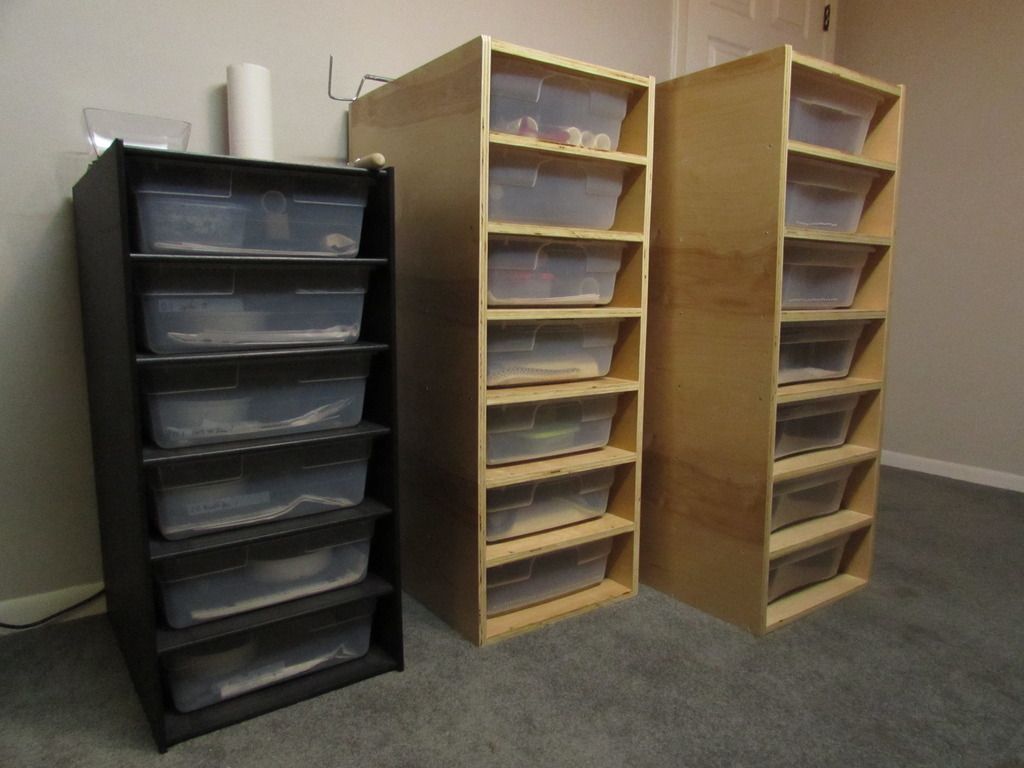
I'll start here with the ultimate DIY herp project, making baby herps! My first Ball Python breeding project was nothing too fancy, a male Bumblebee and a normal female. I was shooting for a female Bumblebee to hold back. The first thing I needed were racks for the adults so off to the lumber yard I went. I built two racks, one a seven tub 28 quart rack and the other a seven tub 41 quart rack. Design for both was simple and straightforward, eight shelves, two sides and the back cut from 3/4 inch Birch plywood all sealed with water based Minwax polyurethane and held together with 1.5 inch #8 screws to make each seven slot rack. The 28 quart rack uses three wide inch heat tape and the 41 quart rack uses eleven inch wide heat tape. Both use one long piece of heat tape snaked from bottom to top along each self in a shallow channel cut with a router and tacked down with silicon so that at no point does a tub come into direct contact with the heat tape. Here the two racks are sitting next to a 28 quart Boaphile rack. I actually wound up using the Boaphile for the Pythons and the 28 quart plywood rack for colubrids, but nevermind that.
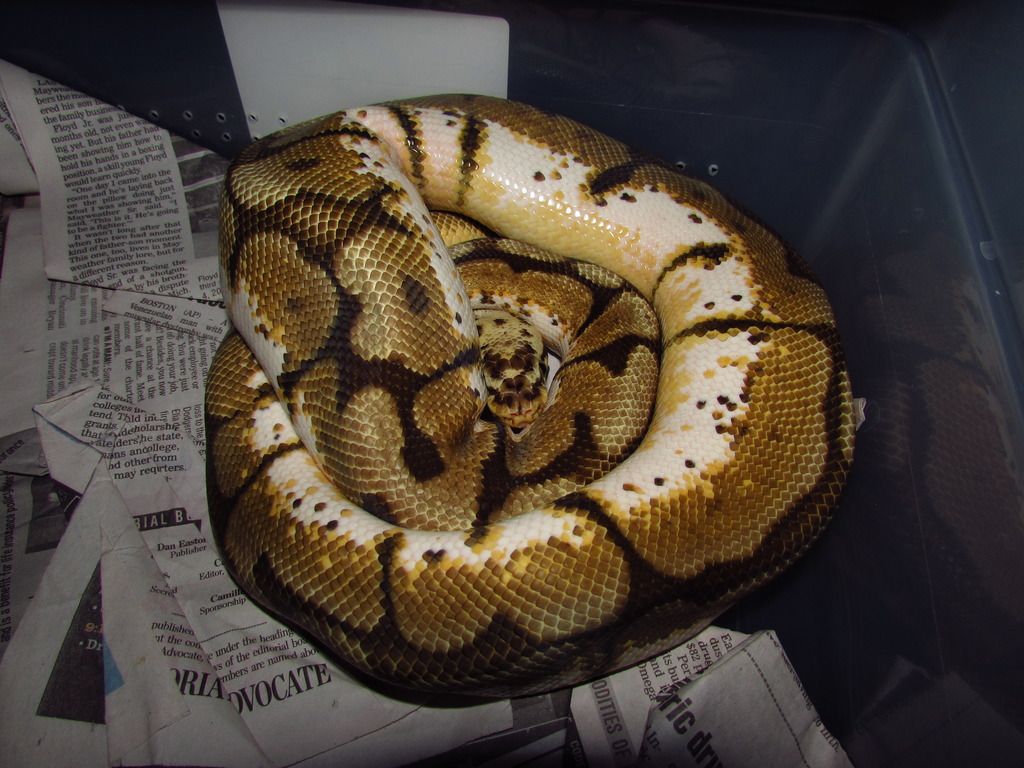
Here is the male. He does not approve of having his picture taken.
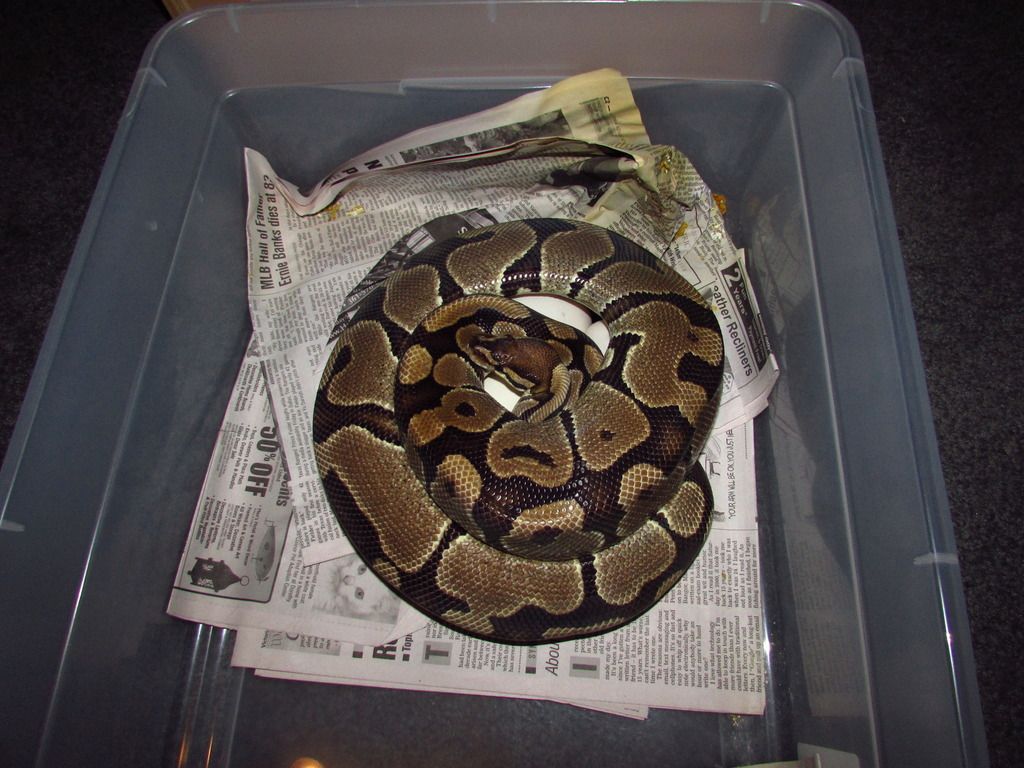
And here is the female as I found her the morning of May 22nd. As of this post all of my BPs are Craigslist rescues (with the exception of the hatchlings, obviously). Most of them came to me with a history of eating and shedding problems. They all shed great now and with one exception they are great eaters. The one exception is an allegedly 100% het albino female who I was hoping to breed to an allegedly 100% het albino male this fall, but those plans are on hold until she decides to be a good eater. The male is a veritable garbage disposal, I wish she would learn from his example. I have a female Spider and a male Pinstripe that should be ready to go this fall so I may shoot for a Spinner in the meantime, or I may just skip this year. I have some time to make up my mind.
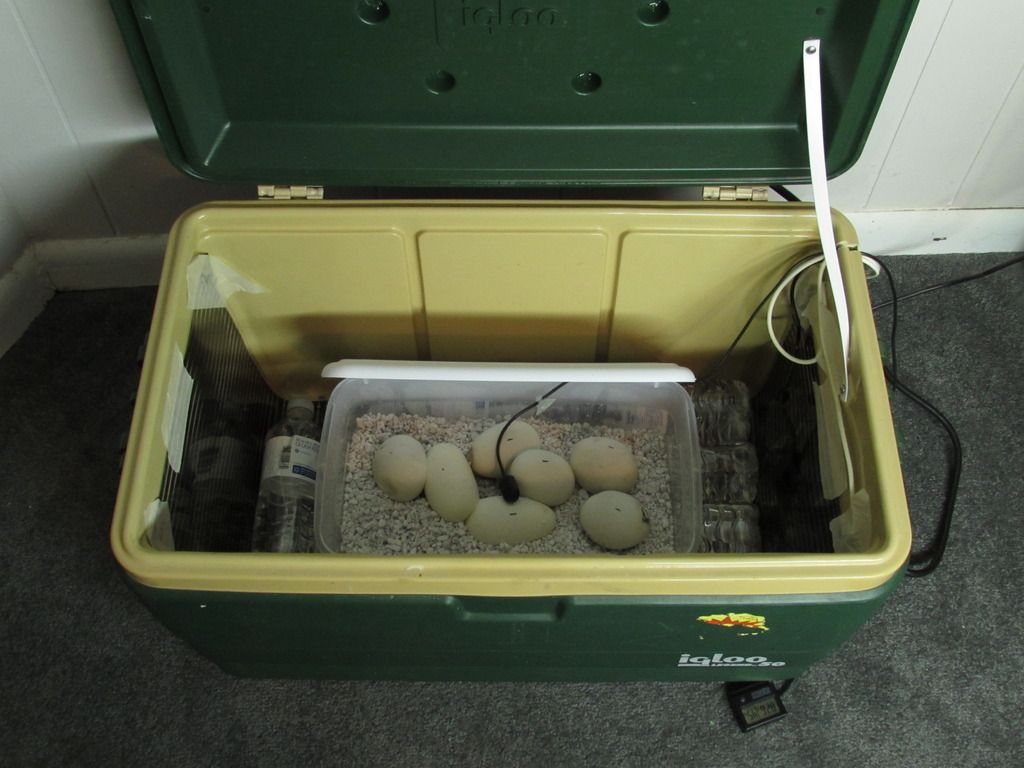
Here are the eggs in their custom made incubator. The incubator probably cost me less than $20, not including the thermostat. The cooler I had already (I'm really not sure how it wound up in my hands, odds are an old roommate left it behind years ago). I laid a few feet of eleven inch heat tape down one side, across the bottom and then up the other side. I cut the head off of a small extension cord, attached two heat tape connectors with a bit of solder, attached the connectors to the heat tape and sealed everything up with electrical tape. Some masking tape to hold the heat tape in place, a few bottles of water, and a 6 quart tub filled halfway with Perlite round out the materials list.
On the eggs themselves: She laid eight initially, seven good and one slug, and passed two more slugs a couple weeks later for a total of ten. The good eggs were not exactly beautiful, most had spots that were not fully calcified. If anyone has any insight on why she laid so many slugs and why the good eggs had non-calcified spots, and suggestions on how to improve the quality of clutches going forward I'm all ears (or eyes in this case, but you get my meaning). This was her first time if that could have anything to do with it. It was also my first time. In November I reduced the hot spot by five degrees at night in the breeder rack (it stays around 91-92 normally) and paired the male Bee and normal female once a week, just after dark. They locked within a couple hours almost every time and I'd remove the male the next morning if they were done, on the few occasions I didn't see a lock I'd remove the male on the third morning. I stopped dropping the temps at the first of March and stopped pairing them after the second week of March, she was huge by then. Her pre-lay shed was on April 21st. The evening of May 21st I peeked into her tub a couple hours after dark to see she was laying, I left her alone until the next morning to be sure she was done before removing the eggs. She weighed 2020 grams at the first of November and ate like a champ on medium rats every Sunday night until abruptly going off feed after a final rat the first day of March.
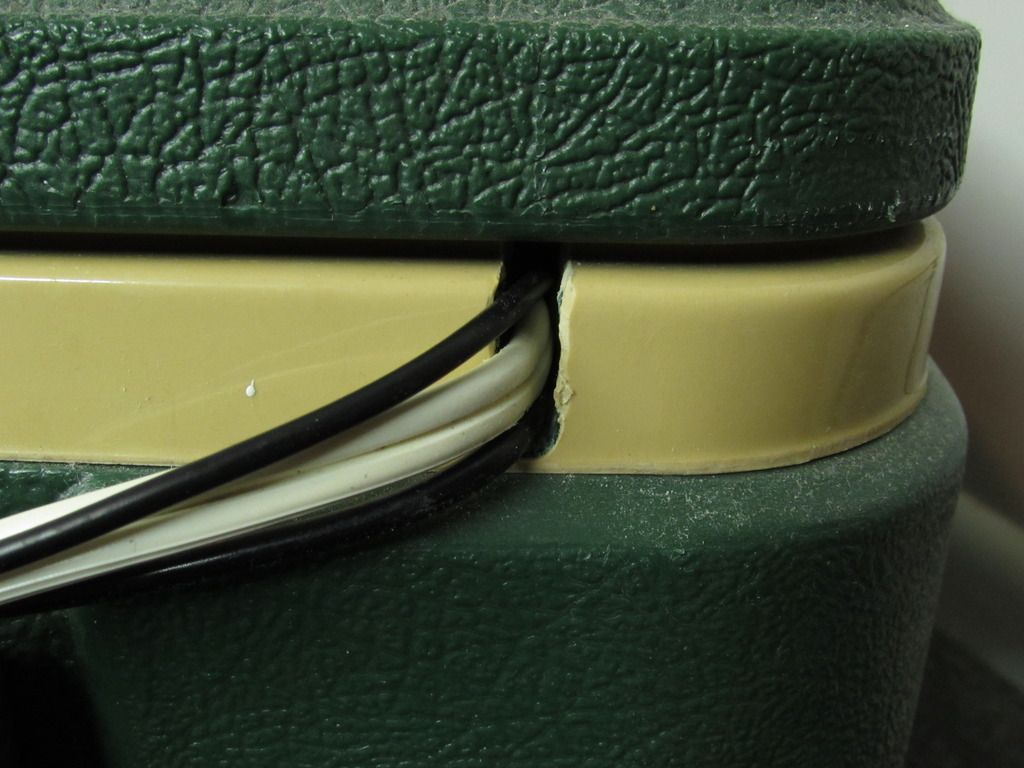
Here is the little slot I cut in the cooler to run the wires.
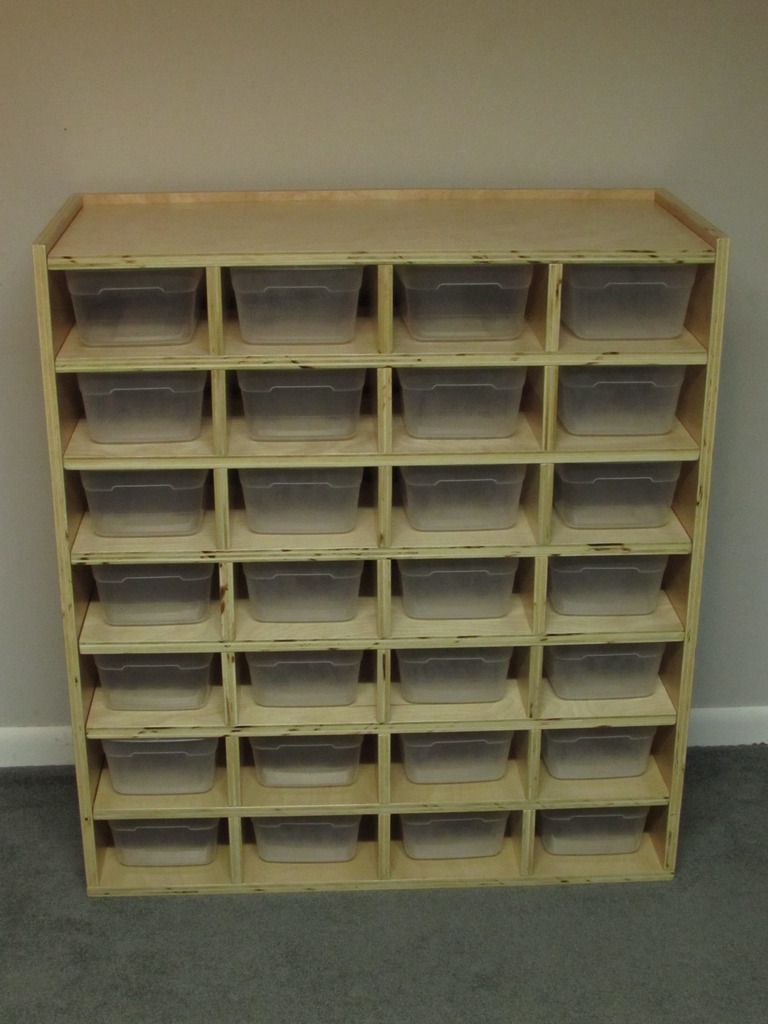
Now for the final piece of this breeding project, the nursery! Now I realize a 28 tub rack is a bit overkill for a single Ball Python clutch but I'm planning on using this thing for a very long time and for many different critters. This rack is obviously a bit more complex in design than the other racks. Getting all of 21 of the dividers exactly the same size was a major pain, complicated by the fact I cut them all almost an eighth of an inch too tall. I intended to cut them about one thirty-second too tall so I could sand out the little irregularities that invariably show up with a palm sander, but sanding almost an eighth of an inch of material off of essentially a 14 by 16 inch block of plywood with a little quarter sheet palm sander seemed to take an eternity. Not fun. But in the end the fit is perfect so all's well that ends well. Same as the other racks the whole thing is built with 3/4 inch Birch plywood, sealed with water based Minwax polyurethane and assembled with 1.5 inch #8 screws. It's heated with one long piece of three inch heat tape tacked down with silicon in a routered channel and uses 6 quart tubs.
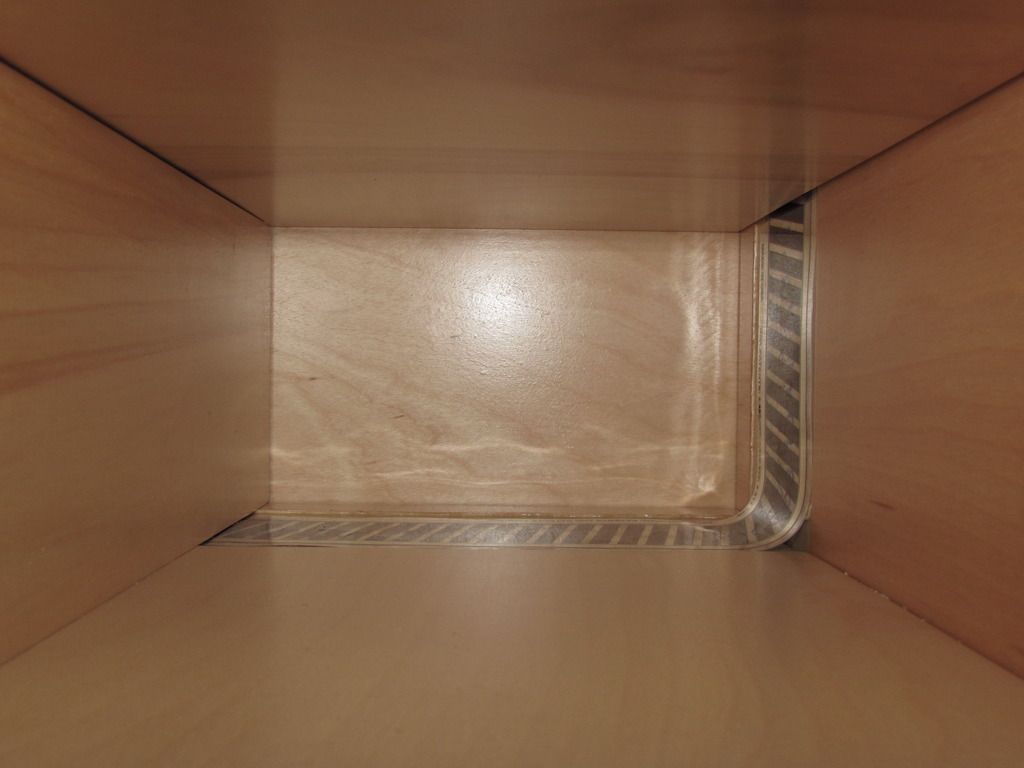
Here you can see the heat tape that runs along the back of each shelf and up the sides.
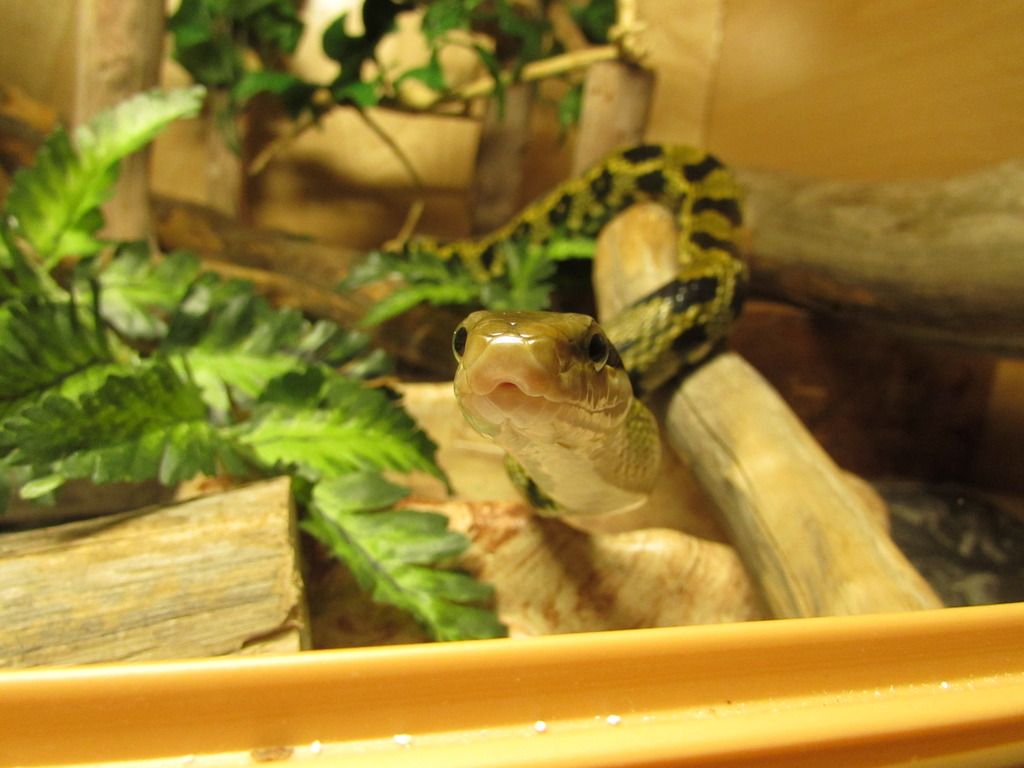
The Taiwanese Beauty was very curious about all this picture taking, no doubt convinced all the movement outside his enclosure surely meant food was on the way. I told him to go back to sleep. He didn't listen.
|

|
|
|
08-02-15, 01:24 PM
|
#2
|
|
Member
Join Date: Mar-2014
Location: Victoria, TX
Age: 40
Posts: 774
Country:
|
Re: FW's (mostly) DIY Snake Room. (Pic heavy)
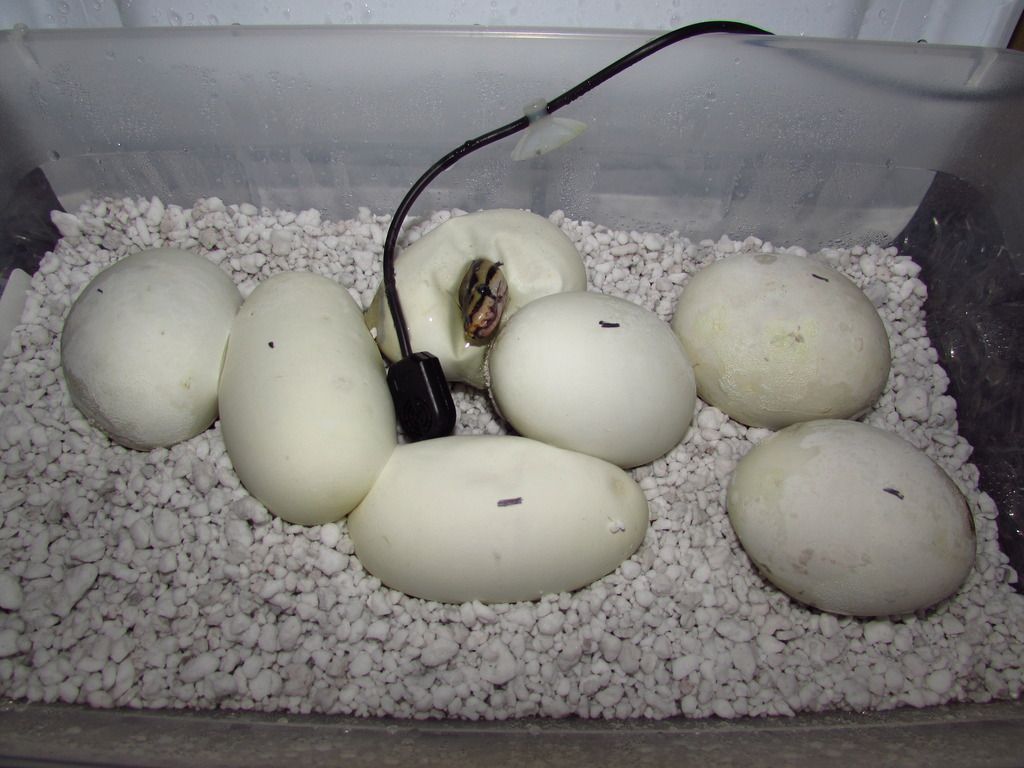
And finally, babies! The first brave little explorer took its first breaths the afternoon of Monday, July 20th. A Spider! The waiting game is over! Or so I thought. I checked on them every two or three hours but there was little change. The last time I peeked in Monday evening one more egg had a slit in it but that was it. Bah, I'll go to bed and check on them in the morning.
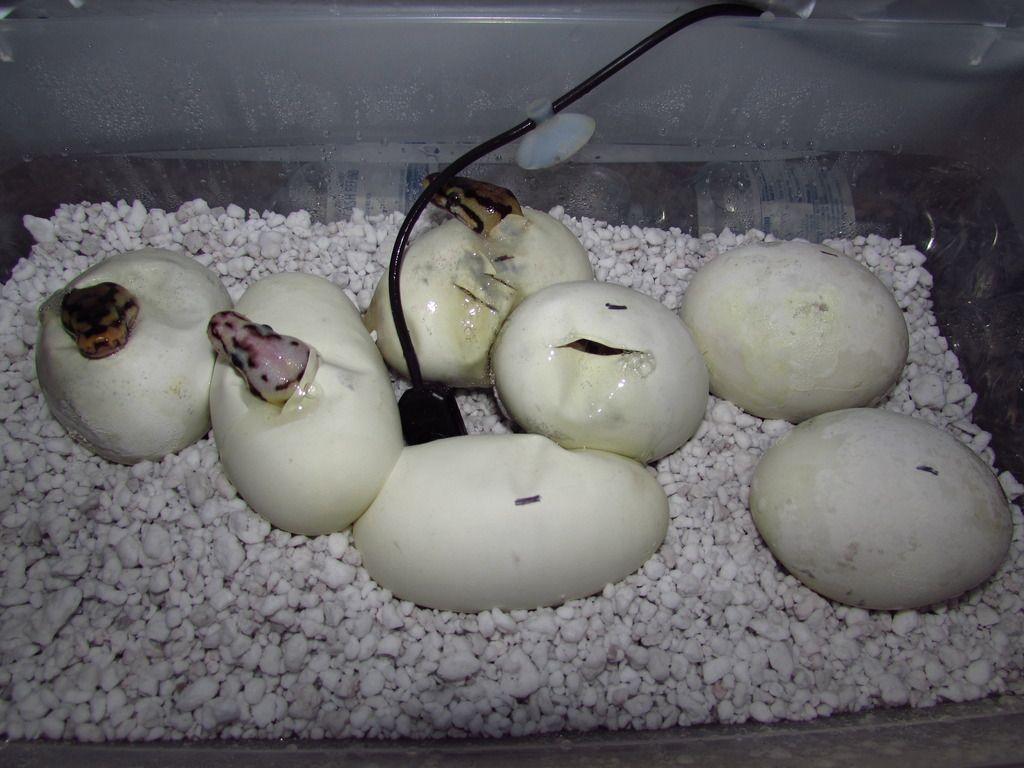
This was the scene Tuesday morning, looks like I got a Bumblebee! I was starting to worry about the two on the far right, they look a little odd. Hopefully I'll find out what's going on with them after work.
Tuesday evening and still nothing from the two eggs on the right. But on the bright side I look to have two normals, two Spiders and a Bumblebee! Just wish they'd hurry up and get out of the eggs already, darn slow pokes...
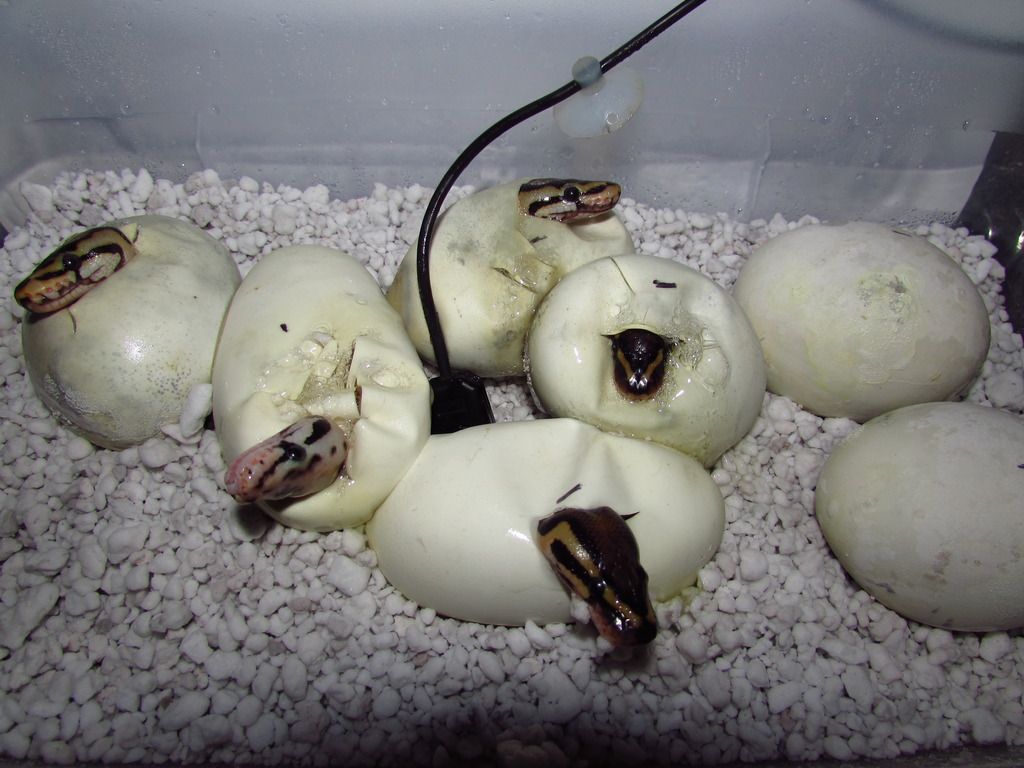
HATCH ALREADY YOU LITTLE... Ahh, err, I mean, aren't they just the cutest little things? This is Wednesday morning. The little Spider that was the first to pip is almost ready to leave its egg, but the bigger news is that the top right egg is slit and the bottom right egg has movement just below the surface! I might get all seven after all! But good grief they are taking forever, guess I'll check in when I get home from work...
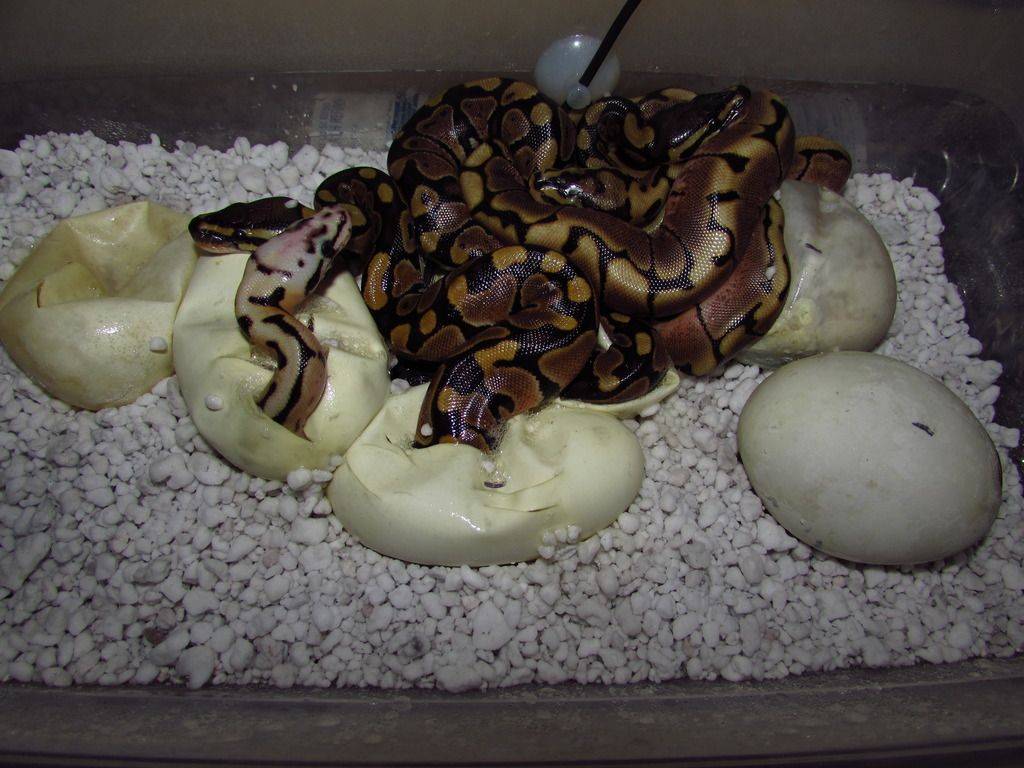
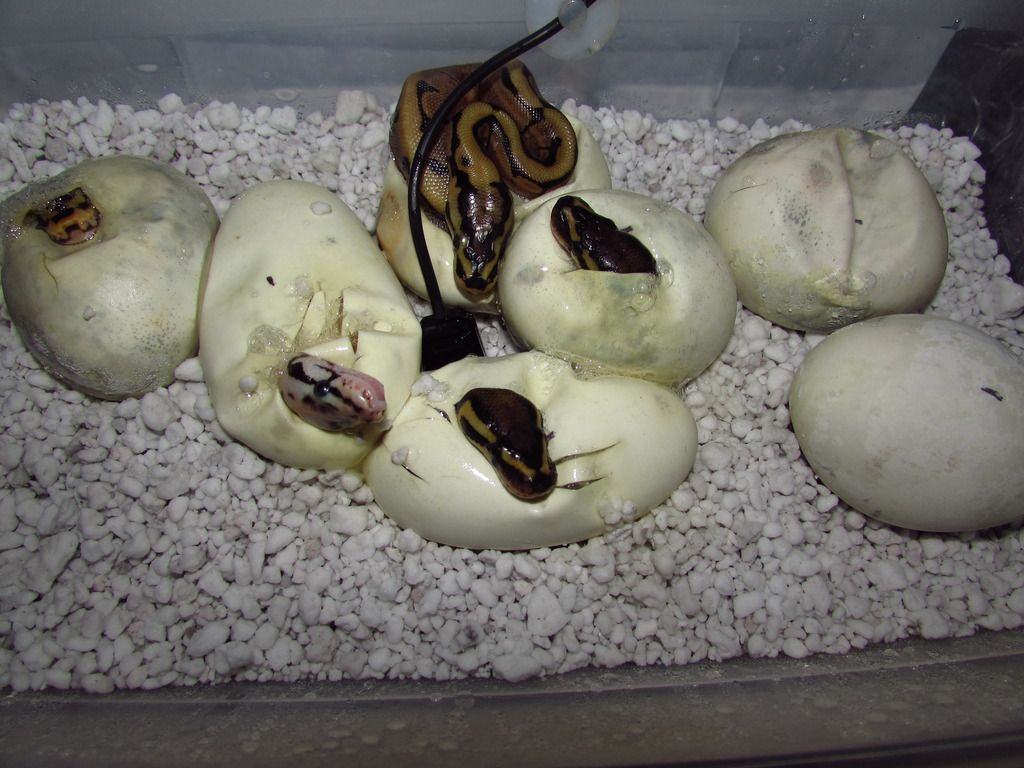
Getting home from work Wednesday evening I open the incubator to find this. The good news is the first four are finally out of the egg, but I do not like the way they are piled on that top right egg. I snap a shot and quickly remove the hatched critters. They were laying right on the slit that had been cut the night before. I grabbed a pair of scissors and cut the egg to see what was going on and was saddened to see a little Spider motionless and unresponsive inside. I had my hopes high about what was in those last two eggs all day at work so to find a Spider presumably smothered by its siblings was depressing indeed. I don't know if it was already weak and they just finished it off or what exactly happened but I was kicking myself for not cutting the egg sooner, if that would have even made a difference. I had considered cutting the last two eggs the night before but decided against it. My heart heavy now I decided to cut the last egg and was relived to see that the little normal inside was still alive. I peeked in the incubator one more time before hitting the hay and the Bumblebee was out of the egg so I moved it in with the other hatchlings. They were temporally housed in a 16 quart tub on damp paper towels. As they shed I moved them into their private accommodations in the nursery rack.
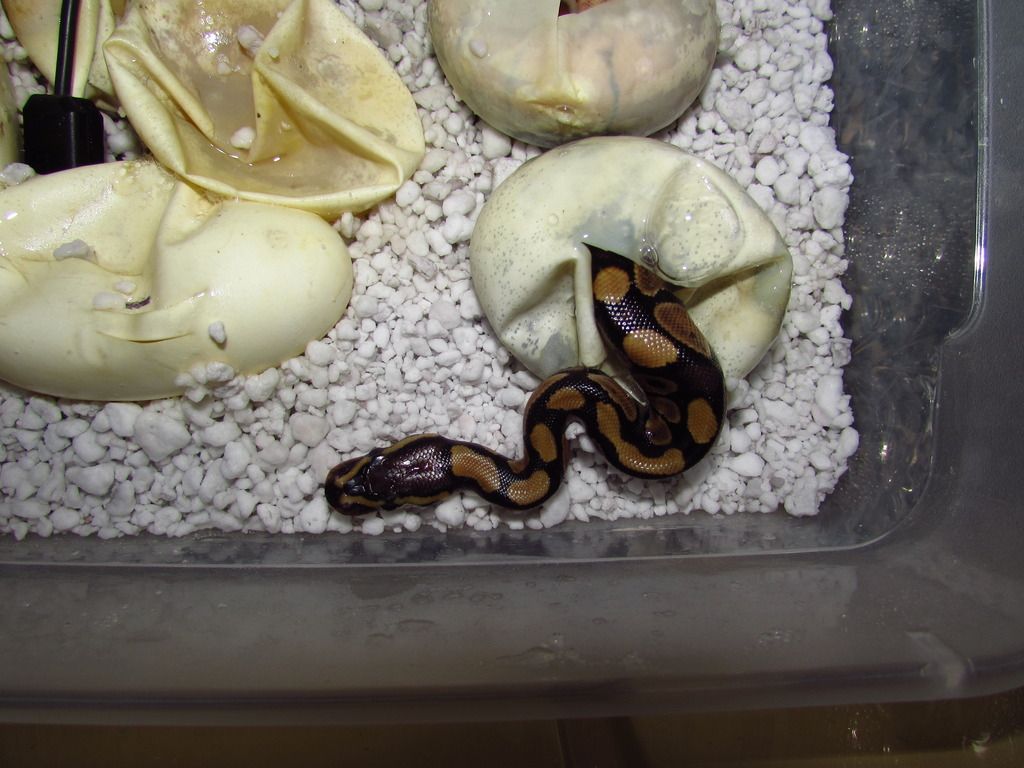
Thursday morning the last little one is just about ready to leave the egg.

Watching them experience the world for the first time was very rewarding, and popping this little Bumblebee as female was the icing on the cake! My first Ball Python clutch produced a two gene female! I could have bought a female Bumblebee for a fraction of the money I put into this project but the experience was very much worth the cost, the work, and the wait. It was all a bit addicting really. I think I just might go for that Spinner this coming season, but seeing those eggs hatch is a whole year away 
|
|
|
|
|
08-02-15, 01:27 PM
|
#3
|
|
Member
Join Date: Dec-2014
Location: Ontario
Posts: 2,118
Country: 
|
Re: FW's (mostly) DIY Snake Room. (Pic heavy)
Not to derail the thread but do you have a pic of the beauty snakes enclosure? Good looking snake.
__________________
1.0 Fire Ball Python (Mushu) 1.0 BCI (Banzai) 0.1 Jaguar Carpet Python (Ono) 1.0 SD Retic (Kaa) 0.1 1.0 Amazon Tree Boa (curly fry - unofficial) black and white cat (Nahla)
|
|
|
|
|
08-02-15, 02:17 PM
|
#4
|
|
Member
Join Date: Mar-2014
Location: Victoria, TX
Age: 40
Posts: 774
Country:
|
Re: FW's (mostly) DIY Snake Room. (Pic heavy)
Quote:
Originally Posted by trailblazer295

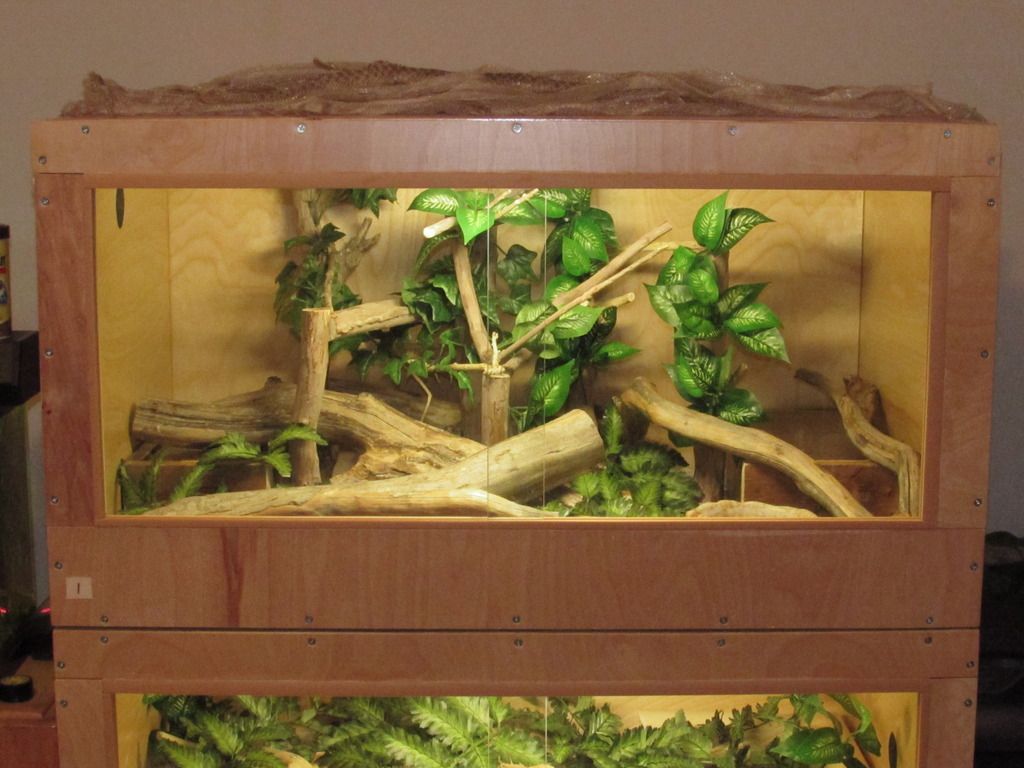
Not to derail the thread but do you have a pic of the beauty snakes enclosure? Good looking snake.
|
This is how it sits as of now. He's not being friendly today because he's in shed. I'll put together a post about this enclosure and the others I've built one of these days. This one is three foot wide, two foot deep and 1.5 foot high. It is heated with eleven inch wide heat tape under the floor on the right side and lit with a small fluorescent light. It is built with 3/4 inch Birch plywood sealed with Minwax polyurethane, same as the racks. Don't mind the small collection of sheds on top lol.
|
|
|
|
|
08-02-15, 02:21 PM
|
#5
|
|
Member
Join Date: Dec-2014
Location: Ontario
Posts: 2,118
Country:
|
Re: FW's (mostly) DIY Snake Room. (Pic heavy)
Nice looking cage. If you don't mind my asking. What's the approximate cost of building a cage like that? Curious how it compares to pre-made PVC cages for future reference. One day I might add a Boa to my collection and I'm fairly handy with my hands and tools but not really the best carpenter to be honest.
__________________
1.0 Fire Ball Python (Mushu) 1.0 BCI (Banzai) 0.1 Jaguar Carpet Python (Ono) 1.0 SD Retic (Kaa) 0.1 1.0 Amazon Tree Boa (curly fry - unofficial) black and white cat (Nahla)
|
|
|
|
|
08-02-15, 03:36 PM
|
#6
|
|
Member
Join Date: Mar-2014
Location: Victoria, TX
Age: 40
Posts: 774
Country:
|
Re: FW's (mostly) DIY Snake Room. (Pic heavy)
Quote:
Originally Posted by trailblazer295
Nice looking cage. If you don't mind my asking. What's the approximate cost of building a cage like that? Curious how it compares to pre-made PVC cages for future reference. One day I might add a Boa to my collection and I'm fairly handy with my hands and tools but not really the best carpenter to be honest.
|
It is hard to say exactly because some of the materials were bought in bulk and I built three enclosures at once, but here is a rough breakdown of some of the major costs:
$47 - 4' X 8' sheet of Birch plywood*
$20 - one quart Minwax polycrylic
$10 - fluorescent light
$10 - two panes of 1/4 inch glass from local glass shop
$8 - two feet of eleven inch heat tape
$6 - sliding glass track
$5 - two two-inch drains (used for ventilation)
$5 - box of 1.5 inch #8 wood screws
$3 - extension cord (cut the head off and use to power the heat tape)
$2 - two heat tape connectors
Other materials that were bought in bulk and harder to estimate include linoleum flooring, hardware cloth (to cover the vents), glue for the glass track and linoleum flooring (I used Liquid Nails), and silicon to seal all the seams. I figure I have roughly $130 or so in the enclosure, give or take a few bucks. Plug the heat tape into a thermostat and the light into a timer and go. I based the built on this thread and modified it to fit my needs. That thread has a good step by step with pictures. I will say that the sliding glass doors are not the strongest option, a strong animal that likes to push (a large Boa or Python for example) could possibly break the glass. Buying tempered glass would probably eliminate this issue but I have not looked into the cost or logistics of acquiring tempered glass. But for young animals or most Colubrids plain old sheet glass works great.
*I'm not sure this enclosure could be cut from a single sheet, I haven't tried to draw that out. I built three enclosures (one 3x2x1.5 and two 3x2x1) from roughly 2.5 sheets, planning the cuts across all three sheets as efficiently as possible. Buying and building in bulk really helps keep costs down. I'm just using one sheet as an example here because that's the minimum you'll have to buy.
|
|
|
|
|
08-02-15, 03:46 PM
|
#7
|
|
Member
Join Date: Dec-2014
Location: Ontario
Posts: 2,118
Country:
|
Re: FW's (mostly) DIY Snake Room. (Pic heavy)
That's some good points, thanks for breaking it down. It doesn't have to be to the penny was just curious on the rough ball park figure. I'm sure materials would cost more here anyway. The doors are the biggest hang up I have as I'd be looking at a small locality BCI but they can posses some power when they chose to exert themselves. Not sure how the fit and security goes in terms of preventing escapes would go. At least with PVC cages keyed locks are locks and they can't be opened. And a full grown boa would actually be a threat to my cat.
Nice looking babies, keep us posted on the progress.
__________________
1.0 Fire Ball Python (Mushu) 1.0 BCI (Banzai) 0.1 Jaguar Carpet Python (Ono) 1.0 SD Retic (Kaa) 0.1 1.0 Amazon Tree Boa (curly fry - unofficial) black and white cat (Nahla)
|
|
|
|
|
08-02-15, 04:48 PM
|
#8
|
|
Member
Join Date: Mar-2014
Location: Victoria, TX
Age: 40
Posts: 774
Country:
|
Re: FW's (mostly) DIY Snake Room. (Pic heavy)
Quote:
Originally Posted by trailblazer295
That's some good points, thanks for breaking it down. It doesn't have to be to the penny was just curious on the rough ball park figure. I'm sure materials would cost more here anyway. The doors are the biggest hang up I have as I'd be looking at a small locality BCI but they can posses some power when they chose to exert themselves. Not sure how the fit and security goes in terms of preventing escapes would go. At least with PVC cages keyed locks are locks and they can't be opened. And a full grown boa would actually be a threat to my cat.
Nice looking babies, keep us posted on the progress.
|
The sliding glass doors are very secure, the gap between the glass doors where they overlap is less than a quarter inch. Anything that could fit through that gap probably shouldn't be kept in an enclosure that size anyway. I don't expect there is much chance of an animal actually sliding the doors open but any concern could be eliminated with a sliding glass window lock. The only real problem is that a strong snake could actually break the glass, and in that event severe injury to the snake is probably going to be a bigger issue than escape. I have a young Dumeril's Boa that will need a bigger enclosure in a year or so, so I'll be looking into different door options for larger enclosures pretty soon myself.
|
|
|
|
|
08-02-15, 04:56 PM
|
#9
|
|
Member
Join Date: Dec-2014
Location: Ontario
Posts: 2,118
Country:
|
Re: FW's (mostly) DIY Snake Room. (Pic heavy)
I wouldn't think a snake could open a sliding door, even a shim like patio doors would keep them from sliding it open. It's hard to picture a snake busting through a glass door but I'm sure it's possible if they were that inclined. I don't know if plastic is stronger then glass in this application. I guess glass would be more prone to shatter while plastic might just crack. Tempered glass probably wouldn't be cheap for large pieces but if it's the final enclosure for the snake then it might be worth it in the long run. Glass is easier to clean.
__________________
1.0 Fire Ball Python (Mushu) 1.0 BCI (Banzai) 0.1 Jaguar Carpet Python (Ono) 1.0 SD Retic (Kaa) 0.1 1.0 Amazon Tree Boa (curly fry - unofficial) black and white cat (Nahla)
|
|
|
|
|
08-02-15, 05:23 PM
|
#10
|
|
Member
Join Date: Mar-2014
Location: Victoria, TX
Age: 40
Posts: 774
Country:
|
Re: FW's (mostly) DIY Snake Room. (Pic heavy)
Glass is easier to clean! I like that point lol, anything that keeps maintenance down is good in my book. The other thing I've been considering to how I would use plastic doors. I like the pvc enclosures that have doors that hinge at the bottom and swing down. The doors fit flush with the front of the enclosure by sitting on a little lip. I don't know if it would be easier to create this little lip in a wood enclosure by building up the front of the enclosure with layers of thin plywood, or by just routering the lip into 3/4 inch plywood. Then there is the question of acrylic vs polycarbonate.
|
|
|
|
|
08-03-15, 03:16 AM
|
#11
|
|
Member
Join Date: Jul-2014
Posts: 331
Country: 
|
Re: FW's (mostly) DIY Snake Room. (Pic heavy)
Thanks for sharing your project. And don't ever apologize for the aesthetics. What you have done is perfectly fine, and looks great. I tend to agree with you, function is more important than form.
__________________
1.1 Diamond pythons, 1.1 Gammon Ranges pythons, 1.1 coastal pythons, 2.0 Murray Darling pythons, 1.1 albino Northwestern pythons, 1.0 spotted python, sand monitor, Spencers monitor, yellow spotted monitor, 1.0 leatherback bearded dragon, eastern water dragon, red spiny tailed monitor.
|
|
|
|
|
08-03-15, 05:41 AM
|
#12
|
|
Member
Join Date: Feb-2013
Location: QC
Posts: 456
Country: 
|
Re: FW's (mostly) DIY Snake Room. (Pic heavy)
Thanks for sharing. I love posts like these. There is beauty in simplicity my friend. Great setup. Congrats on the clutch and getting your bumblebee female!
|
|
|
|
|
10-26-15, 12:15 AM
|
#13
|
|
Member
Join Date: Mar-2014
Location: Victoria, TX
Age: 40
Posts: 774
Country:
|
DIY Snake Hooks!
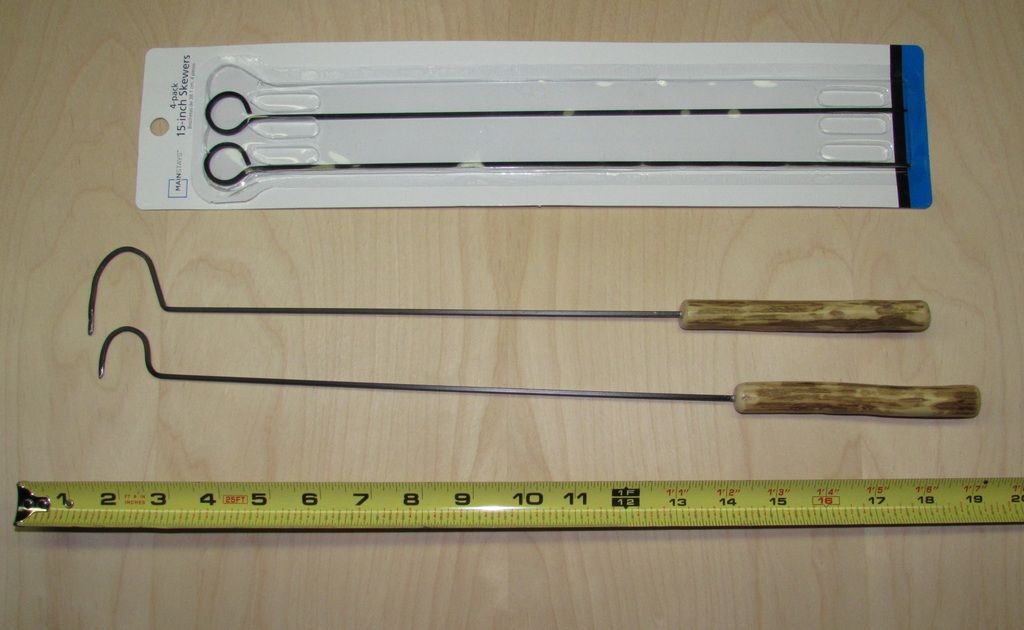
Skewers make great juvie hooks! This four pack at Walmart is $2.44. Just reshape the loop at the end to your specifications, bevel the tip, and add a handle. I used sticks that came from Crape Myrtle trees in my backyard. I found a limb about the right size, put it in the oven at 225 degrees until completely dry, then cut it down to five inch sections. After stripping the bark, shaping the ends and sanding them down I drilled a 1/8 inch hole about two inches deep to insert the skewer. A bit of glue to secure the skewer and a few coats of polyurethane to seal the wood (optional) and you're done.
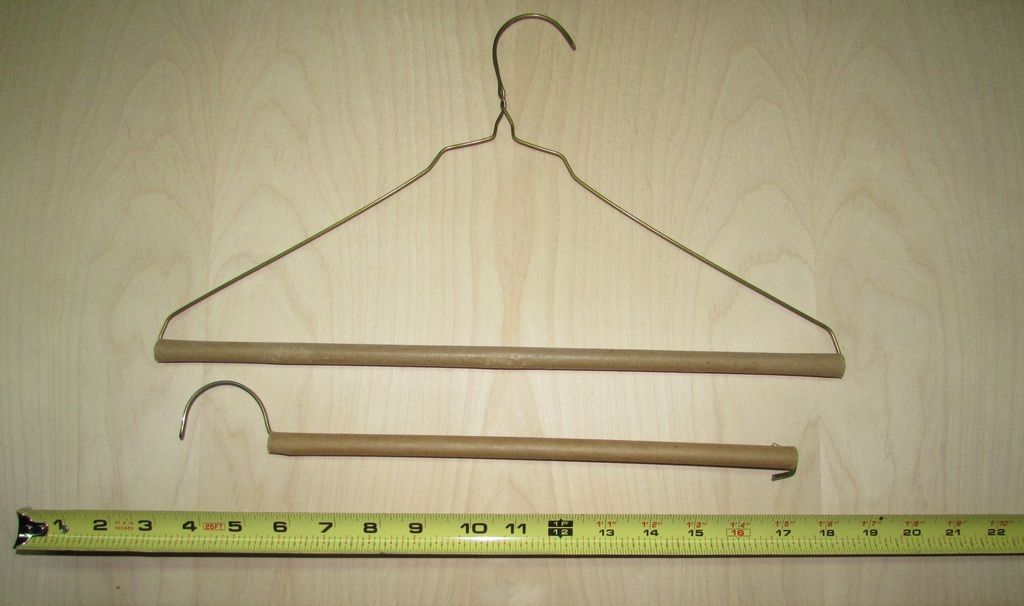
Quick and dirty juvie hook. Just straighten out the hanger and run it back through the cardboard tube. Cut a bit off of the tube so that the wires make it all the way through and bend the wire ends back over the tube. Quick, easy, and plenty sturdy, though it is a bit short.
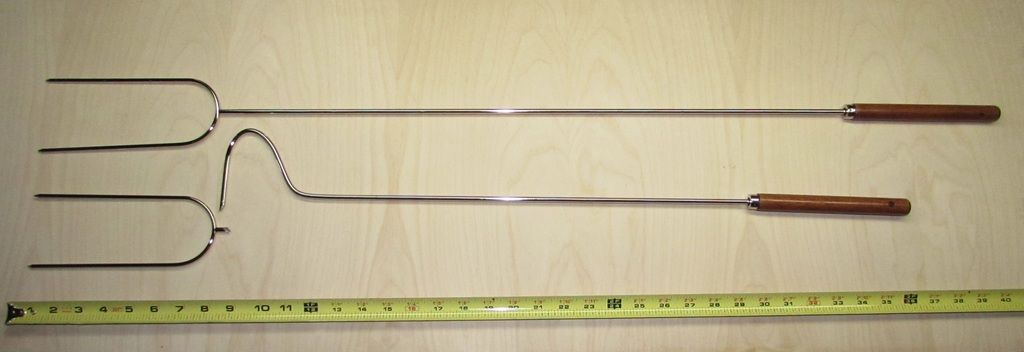
This $2.88 campfire fork from Walmart makes a great mid-sized hook. I made the bends with the fork still attached, the extra leverage made the job very easy. Used the edge of a table to make the initial bends, then the leg of a kitchen chair to shape the hook. A cut-off wheel on a Dremel to remove the fork and a stone to clean up the edges and ta-da! A mid-sized hook, handle and all for less than three bucks and ten minutes worth of work. Cheap enough to have extras laying around anywhere you may need one.
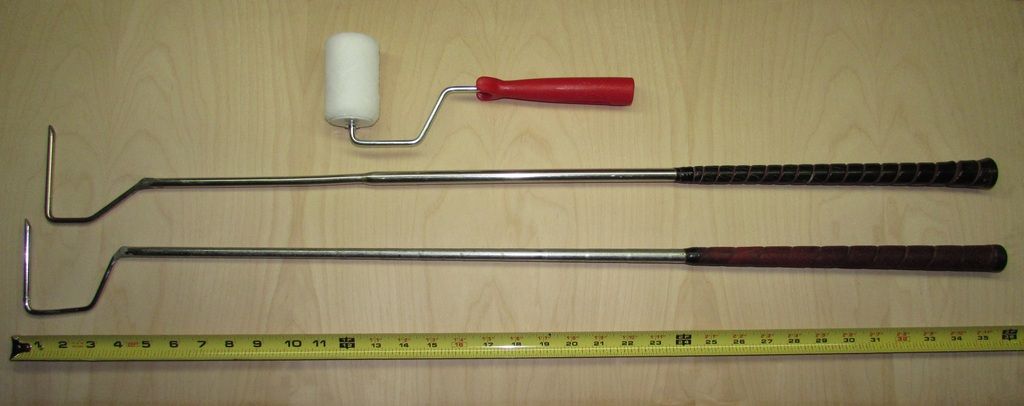
And of course, the paint roller golf club hooks. Requires more materials and labor than the campfire fork hook above, but definitely the way to go if you need a bigger hook. These are two very old clubs I got from a friend. The black handle is my field hook, it was an iron. I found a paint roller made of heavy gauge wire for it, it has proven to be very durable. The red handle hook was a wood, I used a lighter gauge paint roller for it. Many great write-ups on making paint roller golf club hooks out there. Here is the one I used, complete with step by step pictures.
__________________
Science. It reduces the stupid.
|
|
|
|
|
11-16-15, 09:05 PM
|
#14
|
|
Member
Join Date: Mar-2014
Location: Victoria, TX
Age: 40
Posts: 774
Country:
|
What a difference a year makes.
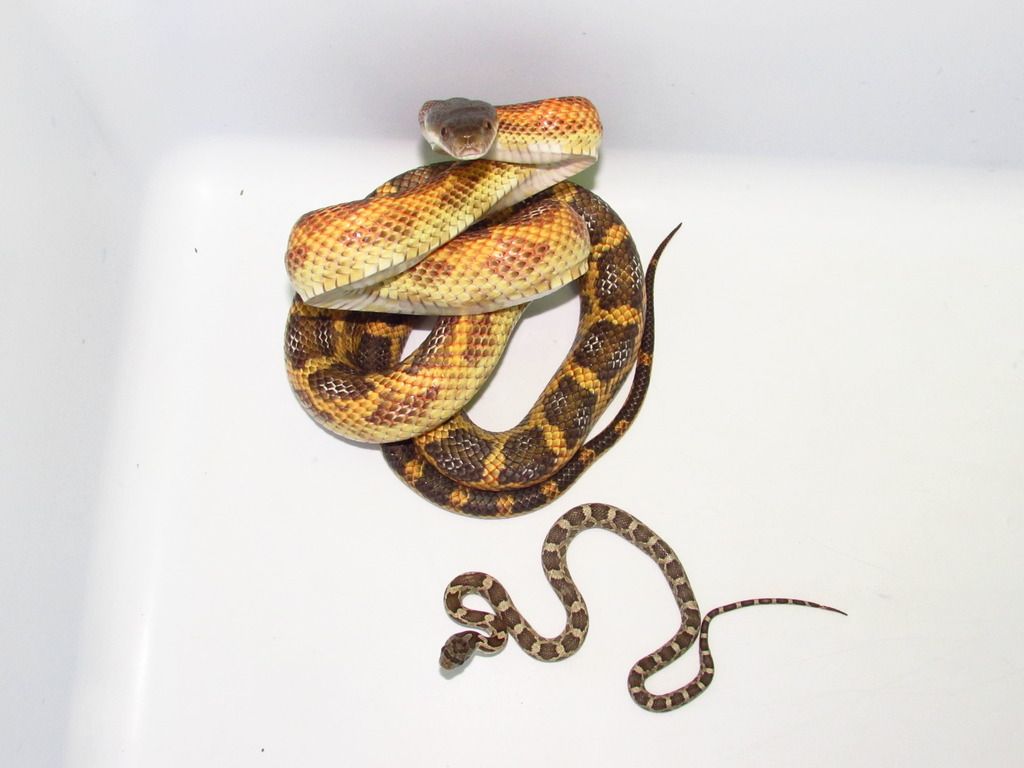
A few weeks ago I walked into my kitchen and saw a shoelace stretched out along the baseboard, a hatchling Western Rat Snake! Now I find many hatchlings crawling about the brickwork on the side of my house every year, but this is the first snake I've found inside the house in the eight or so years I've lived here. I picked it up and found myself faced with a dilemma. I already have a Western Rat Snake but omg so cute! I tried to work around it with reason. It is very thin I thought, it looks dehydrated. It has probably been stuck in the house for some time, if I release it will be too weak to fend for itself. Ridiculous, it is a snake, it will be fine. But it would be a good story, like the dog I had as a kid who dug into the backyard and we found hanging out with our other dogs (We named her Bunny, because she dug under the fence into our backyard on Easter. We put up fliers and what have you but nobody claimed her so she stayed with us). In the end its personality swayed my decision, it seems to be much less defensive than my other Western Rat. I'd like to be able to demonstrate just how different the individual personalities of snakes can be, even within the same species. And it has a story. That's it then, it is a keeper.
This evening, while performing some routine maintenance in the snake room, it stuck me just how big my yearling Western Rat was relative to the newcomer. The yearling weighed in at 349 grams, the hatchling tips the scales at just 12 grams. That's almost 30 times bigger. The yearling has also colored up nicely, lots of yellow and orange. I stuck them both in my makeshift lightbox for a quick shot. What a difference a year makes.
__________________
Science. It reduces the stupid.
|
|
|
|
|
11-17-15, 12:18 PM
|
#15
|
|
Forum Moderator
Join Date: Dec-2014
Location: middle tn
Posts: 4,269
Country:
|
Re: FW's (mostly) DIY Snake Room. (Pic heavy)
Awww!!! That's awesome! And woooow!
__________________
"THE Reptiholic"
I stopped counting at 30....
|
|
|
|
 Posting Rules
|
You may not post new threads
You may not post replies
You may not post attachments
You may not edit your posts
HTML code is Off
|
|
|
All times are GMT -6. The time now is 03:21 PM.
Powered by vBulletin®
©2000 - 2025, Jelsoft Enterprises Ltd.

Copyright © 2002-2023, Hobby Solutions.
|
 |


 Linear Mode
